适配器模式定义的:将一个类的接口转换成客户希望的另外一个接口。Adapter 模式使得由于接口而不能一起工作的那些类。
适配器模式分为适配器模式和适配器模式。区别仅在于适配器角色对于被适配角色的适配是通过完成的还是通过来完成的。由于在java 中不支持多重继承,而且继承有破坏封装之嫌,众多的书中都提倡使用组合来代替继承。对于C++,为了实现类适配器模式,需要通过多继承实现。
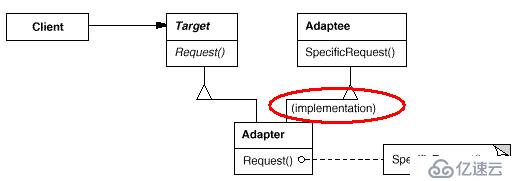
一、UML示意图
1)采用原有接口类的方式(适配器模式)
2)采用原有接口类的方式(适配器模式)
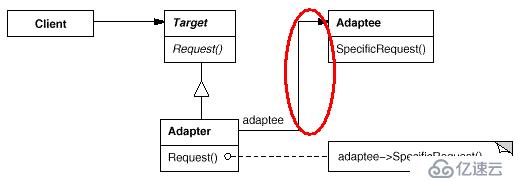
二、组成:
1)采用原有接口类的方式(适配器模式):
a,目标(Target)角色:这就是所期待的接口。注意,,由于这里讨论的是类适配器模式,因此。
b,源(Adaptee)角色:现有需要适配的接口。
c,适配器(Adapter)角色:适配器类是本模式的核心。适配器把源接口转换到目标接口。显然这一角色。
2)采用原有接口类的方式(适配器模式):
a, 目标(Target)角色:这就是所期待的接口。注意,,。
b,源(Adaptee)角色:这个角色,而这个接口是需要我们适配的。
c,适配器(Adapter)角色:这个适配器模式的核心。它将源角色已有的接口转换为目标角色希望的接口。,。
三、代码实现:
1)采用原有接口类的方式(适配器模式):
ClassAdapter.java:
interface Target{
public void operation1();
public void operation2();
}
class Adaptee {
public void operation2() {
System.out.println("operation2 come from Adaptee");
}
}
class Adapter {
@Override
public void operation1() {
// TODO Auto-generated method stub
System.out.println("operation1");
}
}
public class ClassAdapter {
public static void main(String[] args) {
Adapter ad = new Adapter();
ad.operation1();
ad.operation2();
}
}
运行结果:
operation1
operation2 come from Adaptee
//============================================================================
// Name : ClassAdapter.cpp
//, Author ,,,,,,, Yan 曹国伟
//, Version ,,,,:
//, Copyright ,,:, Your Copyright 注意
//, Description :, Hello World c++,拷贝,Ansi-style
//============================================================================
# include & lt; iostream>
using namespace 性传播疾病;
class Target {
公共:
, virtual void operation1 (),=, 0;
, virtual void operation2 (),=, 0;
, virtual ~目标(){}
};
class Adaptee {
公共:
, void operation1 () {
,, cout & lt; & lt;,“operation1 得到Adaptee !“, & lt; & lt;, endl;
,}
};
class Adapter :, {
公共:
, virtual void operation2 (), {
,, cout & lt; & lt;,“operation2 !“, & lt; & lt;, endl;
,}
, virtual void operation1 (), {
,, operation1 ();,,,
,}
};
int 主要(),{
, Adapter * ad =, new 适配器();
,广告→operation1 ();
,广告→operation2 ();
, return 0;
}
,
运行结果:
operation1 得到Adaptee !
operation2 !null