介绍 Python主要应用领域有哪些 import numpy as np
import matplotlib.pyplot as plt
#,slices will be ordered 以及plotted 逆时针。
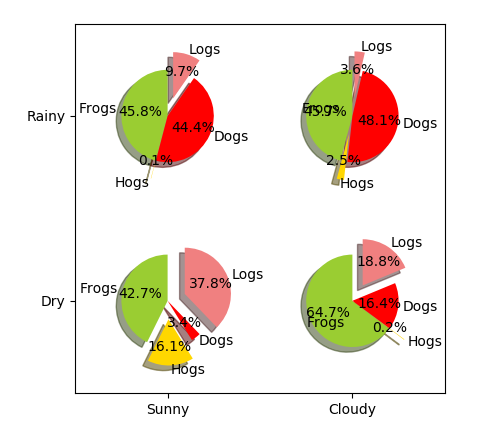
labels =& # 39;青蛙# 39;& # 39;猪# 39;,& # 39;狗# 39;& # 39;日志# 39;
sizes =[10] 15、30、45
colors =[& # 39;黄绿色# 39;& # 39;黄金# 39;,& # 39;# ff0000 # 39;, & # 39; lightcoral& # 39;】
#使饼状图中第2片和第4片裂开
explode =(0.1 0, 0.1, 0,)
时间=fig plt.figure ()
时间=ax fig.gca ()
ax.pie (np.random.random(4),,=爆炸,爆炸,=标签,标签,颜色=颜色,
autopct=& # 39; % 1.1 f % % & # 39;,,影子=True, startangle=90,
半径=0.25,=(0,0),中心,?True)
ax.pie (np.random.random(4),,=爆炸,爆炸,=标签,标签,颜色=颜色,
autopct=& # 39; % 1.1 f % % & # 39;,,影子=True, startangle=90,
,中心半径=0.25,=(1,1),?True)
ax.pie (np.random.random(4),,=爆炸,爆炸,=标签,标签,颜色=颜色,
autopct=& # 39; % 1.1 f % % & # 39;,,影子=True, startangle=90,
,中心半径=0.25,=(0,1),?True)
ax.pie (np.random.random(4),,=爆炸,爆炸,=标签,标签,颜色=颜色,
autopct=& # 39; % 1.1 f % % & # 39;,,影子=True, startangle=90,
,中心半径=0.25,=(1,0),?True)
#设置坐标轴刻度
ax.set_xticks ([0, 1])
ax.set_yticks ([0, 1])
#设置坐标轴刻度上显示的标签
ax.set_xticklabels ([“Sunny",“Cloudy"])
ax.set_yticklabels ([“Dry",“Rainy"])
#设置坐标轴跨度
ax.set_xlim ((-0.5, 1.5))
ax.set_ylim ((-0.5, 1.5))
#设置纵横比相等
ax.set_aspect(& # 39;平等# 39;)
plt.show ()
本篇文章为大家展示了如何在Python中利用matplotlib绘制饼状图,内容简明扼要并且容易理解,绝对能使你眼前一亮,通过这篇文章的详细介绍希望你能有所收获。
1,云计算,典型应用OpenStack.2,网前端开发,众多大型网站均为Python开发。3。人工智能应用,基于大数据分析和深度学习而发展出来的人工智能本质上已经无法离开python.4,系统运维工程项目,自动化运维的标配就是python + Django/flask.5,金融理财分析,量化交易,金融分析。6,大数据分析。
<强>一代码
<强>二运行结果
上述内容就是如何在Python中利用matplotlib绘制饼状图,你们学到知识或技能了吗?如果还想学到更多技能或者丰富自己的知识储备,欢迎关注行业资讯频道。