,,,,,,(3)xcache
,,,,,,(4)为phpMyAdmin提供https虚拟主机;
,<强> <强>
,,,,IP ,,,系统,,,,安装软件,,192.168.1.103 ,,CentOS 7 httpd, php, wordpress, phpMyAdmin ,192.168.1.104 ,,CentOS 7 mariadb
开始前下载阿里云的基源到本地。
, 1, 192.168.1.104主机配置(数据库的创建,授权等)
,,,, (root@localhost yum.repos。d] # yum安装mariadb mariadb-server - y
,,,, (root@localhost yum.repos。d] # systemctl开始mariadb.service
,,,,【root@localhost ~】# mysql_secure_installation,//设置安全向导,根密码改为mageedu
,,,,
<人力资源/>,
,,,,/usr/bin/mysql_secure_installation: 379行:find_mysql_client:命令没有找到
,,,,注意:运行这个脚本的所有部分建议所有MariaDB
,,,,,,服务器在生产使用!,请仔细阅读每一步!
,,,,为了登录MariaDB安全,我们需要当前
,,, root用户的密码。,如果你刚刚安装MariaDB,
,,,,你还没有设置root密码,密码将空白,
,,,,所以你应该在这里按回车。
,,,,输入当前密码为根(没有输入):,
,,,,好吧,成功地使用密码,移动alt=" CentOS 7系统之灯(模块)详解">
,,,, (root@localhost html) # systemctl重载httpd.service
,,,, 
3, xcache的编译安装
,,
,,,,【root@localhost ~】#,,//安装开发包组
,,,,【root@localhost ~】# yum安装php-devel - y//安装xcache依赖php的包
,,,,
,下载xcache压缩包
,,,,【root@localhost ~】# ls
,,, anaconda-ks。cfg, xcache-3.2.0.tar.bz2
,,,,【root@localhost ~】# tar xf xcache-3.2.0.tar.bz2
,,,,【root@localhost ~】# ls
,,, anaconda-ks。cfg, xcache-3.2.0, xcache-3.2.0.tar.bz2
,,,,【root@localhost ~】# cd xcache-3.2.0/
,,,, (root@localhost xcache-3.2.0] phpize #
,,,, (root@localhost xcache-3.2.0] # ./configure——enable-xcache with-php-config=/usr/bin/php-config
,,,, (root@localhost xcache-3.2.0] #做,,使安装
,,,, 
,,
,,,, (root@localhost xcache-3.2.0] # cp xcache。ini/etc/php.d/
,,,, (root@localhost xcache-3.2.0] # systemctl启动httpd。服务
,,,,
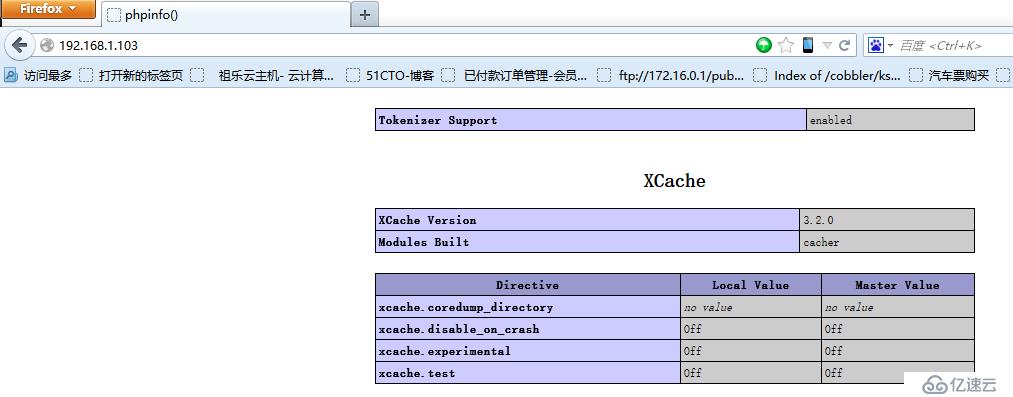
,浏览器访问,发现xcache已经安装完,对应版本为3.2.0
,,,, 
4,安装配置wordpress,配置虚拟主机
,配置虚拟主机,
,,,,【root@localhost ~】# vim/etc/httpd/conf/httpd.相依,//注释掉httpd默认访问路径
,,,, # DocumentRoot "/var/www/html "
,,,,
,,,(root@localhost ~) # vhost mkdir/web//test1 pv//创建虚拟主机的访问路径
,,,,【root@localhost ~】# vim/etc/httpd/conf.d/vhost.相依,//创建虚拟主机的配置文件
,
,,,, & lt;虚拟主机192.168.1.103:80>
,,,,DocumentRoot“vhost/web//test1”
,,,,vhost & lt;目录“/web//test1”在
,,,,,,,,选项没有
,,,,,,,,AllowOverride没有
,,,,,,,,要求所有授予
,,,,& lt;/Directory>
,,,, & lt;/VirtualHost>
,,,,,,,
,null