LNMP的网段为:
172.16.10.0/24
服务容器与各个ip:
nginx 172.16.10.10
mysql 172.16.10.20 php 172.16.10.30 * *
导入一下镜像包:
mysql5.7
php.7.2-fpm.tar
wordpress.tar
nginx.tar
将导入的镜像包导成码头工人可用的镜像:
码头工人加载& lt;nginx。焦油和,码头工人加载& lt;wordpress。焦油和,码头工人加载& lt;mysql - 5.7。焦油和,码头工人加载& lt;nginx。焦油和,码头工人加载& lt;php.7.2-fpm.tar
宿主机创建两个目录:
分别是:
网站的访问主目录:mkdir/wwwroot
配置文件目录:mkdir/码头工人
nginx准备工作:
nginx配置文件:/etc/nginx conf.d
nginx主目录:/usr/share/nginx/html
先运行一个nginx容器,将容器里的nginx主目录和配置文件导出来:
码头工人itd——名字测试运行nginx:最新
码头工人cp测试:/etc/nginx/码头工人
测试:码头工人cp/usr/share/nginx/html/wwwroot
80年查看端口,不可被占用:
netstat -anpt | grep 80
准备工作已经完成,接下来开始部署各个服务:
1)创建一个自定义网络:
码头工人网络创建- d桥——子网172.16.10.0/24网关172.16.10.1 lnmp
2)运行nginx:
码头工人运行nginx itd -名字- v/码头工人/nginx:/etc/nginx - v/wwwroot/html:/usr/share/nginx/html - p 80:80——网络lnmp ip 172.16.10.10 nginx
更改nginx访问界面:
cd/wwwroot/html
猫指数。html
你好lnmp
访问本机验证:127.0.0.1旋度
你好lnmp
浏览器访问出下面就成功:

3)运行mysql:
运行一个mysql容器,并为它创建密码为123. com:
码头工人运行——名称mysql - e MYSQL_ROOT_PASSWORD=123. com - d - p 3306:3306——网络lnmp ip 172.16.10.20 mysql:
登录mysql验证:
先下载一个mysql
[root@localhost ~] # yum - y安装mysql
访问验证:
(root@localhost ~) # 3306根-p123.com - h 127.0.0.1 mysql - u - p
随便新建一个库做验证:
MySQL((没有))比;创建数据库名称;
再查看有没有刚创建的库:
MySQL((没有))比;显示数据库;
4)运行php容器:
运行一个php容器
[root@localhost ~] #码头工人运行itd -名称phpfpm - p 9000:9000 - v/wwwroot/html:/usr/share/nginx/html——网络lnmp ip 172.16.10.30 php: 7.2 fpm
添加php测试界面:
[html] root@localhost # pwd
/wwwroot/html
[root@localhost html] # vim test.php
& lt; ?
php phpinfo ();
?在
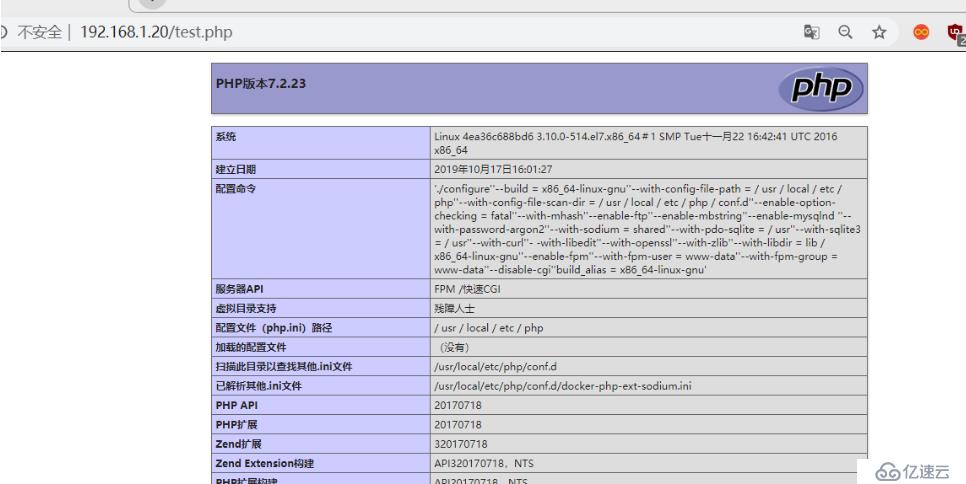
浏览器访问:出现下面界面就成功
5)修改nginx配置文件,nginx和php连接
[root@localhost conf.d] # pwd
/码头工人/nginx/conf.d
[root@localhost conf.d] # vim违约。参看
10行:添加index . php解析
?指数指数。html索引。htm index . php,
30行:打开模块(去掉#并添加)并更改相信息:
位置~。php $ {
根/usr/share/nginx/html;
fastcgi_pass 172.16.10.30:9000;
fastcgi_index index . php,
fastcgi_param SCRIPT_FILENAME document_root fastcgi_script_name美元;
包括fastcgi_params;
}
重启nginx服务:
[root@localhost conf.d] #码头工人重启nginx
nginx
关闭防火墙:
[root@localhost conf.d] # systemctl停止firewalld
[root@localhost conf.d] # systemctl禁用firewalld
重启码头工人:
[root@localhost conf.d] # systemctl daemon-reload
[root@localhost conf.d] # systemctl重启码头工人
重启所有容器:
[root@localhost conf.d] #码头工人ps - q | xargs码头工人开始
接下来是php和mysql的连接,在这里我们使用一个phpMyAdmin的数据库管理工具。
下载导入phpMyAdmin-4.9.1-all-languages
导入需要的包:
[html] root@localhost # pwd
/wwwroot/html
[html] root@localhost # ls
50 x。html phpMyAdmin-4.9.1-all-languages.zip
索引。html test.php
解压:
[html] root@localhost # phpMyAdmin-4.9.1-all-languages解压缩。zip
[html] root@localhost # ls
50 x。html phpMyAdmin-4.9.1-all-languages test.php
索引。html phpMyAdmin-4.9.1-all-languages.zip
名字太长不好记,待会要在nginx配置文件更改,重命名一下: