介绍 pip install pytest 与门,与非门,或门
得到perception import and_operate,, nand_operate, or_operate
def test_and_operate ():
,“““
,测试与门
,返回:
,“““
,assert and_operate (1, 1),==1
,assert and_operate (1, 0),==0
,assert and_operate (0, 1),==0
,assert and_operate (0, 0),==0
def test_nand_operate ():
,“““
,测试与非门
,返回:
,“““
,assert nand_operate (1, 1),==0
,assert nand_operate (1, 0),==1
,assert nand_operate (0, 1),==1
,assert nand_operate (0, 0),==1
def test_or_operate ():
,“““
,测试或门
,返回:
,“““
,assert or_operate (1, 1),==1
,assert or_operate (1, 0),==1
,assert or_operate (0, 1),==1
,assert or_operate (0, 0),==, import numpy as np
def step_function (x):
,“““
,阶跃函数
,:param x:
,返回:
,“““
,if x & lt;=, 0:
,return 0
,其他的:
return 才能;1
def and_operate (x1, x2):
,“““
,与门
,:param x1:
,:param x2:
,返回:
,“““=,,x np.array ((x1, x2))=,,w np.array ([0.5, 0.5])
b -0.7=,
,return step_function (np.sum (w *, x), +, b)
def nand_operate (x1, x2):
,“““
,与非门
,:param x1:
,:param x2:
,返回:
,“““=,,x np.array ((x1, x2))=,,w np.array ([-0.5, -0.5])
b 0.7=,
,return step_function (np.sum (w *, x), +, b)
def or_operate (x1, x2):
,“““
,或门
,:param x1:
,:param x2:
,返回:
,“““=,,x np.array ((x1, x2))=,,w np.array ([0.5, 0.5])
b -0.3=,
,return step_function (np.sum (w *, x), +, b) ==========================================================================, test session starts ===========================================================================platform darwin ——, Python 3.6.8,, pytest-5.1.2,, py-1.8.0,, pluggy-0.12.0 ,,/用户/mac/.virtualenvs//bin/python3工作
…
collected 3, items ,,,,,,,,,,,,,,,,,,,,,,,,,,,,,,,,,,,,,
test_perception.py: test_and_operate PASSED ,,,,,,,,,,,,,,,,,,,,,,,,,,,,, (, 33%)
test_perception.py: test_nand_operate PASSED ,,,,,,,,,,,,,,,,,,,,,,,,,,,,, (, 66%)
test_perception.py: test_or_operate PASSED ,,,,,,,,,,,,,,,,,,,,,,,,,,,,,, (100%)===========================================================================,3,passed 0.51 s 拷贝============================================================================ 得到perception import and_operate,, nand_operate,, or_operate,, xor_operate def test_xor_operate ():
,“““
,测试异或门
,返回:
,“““
,assert xor_operate (1, 1),==0
,assert xor_operate (1, 0),==1
,assert xor_operate (0, 1),==1
null
null
null
null
null
null
null
null
null
null
null
null
null
null
null
null
null
null
null
null
本篇文章为大家展示了利用Python怎么编写一个感知器的逻辑电路,内容简明扼要并且容易理解,绝对能使你眼前一亮,通过这篇文章的详细介绍希望你能有所收获。
与门,与非门,或门
通过一层感知器就可以实现与门,与非门,或门。
先写测试代码test_perception。py:
0写完测试代码,后面直接输入命令,,pytest -v 即可测试代码。
这三个门的权重和偏置是根据人的直觉或者画图得到的,并且不是唯一的。以下是简单的实现,在感知。py中写上:
运行,,pytest -v 确认测试通过。
异或门
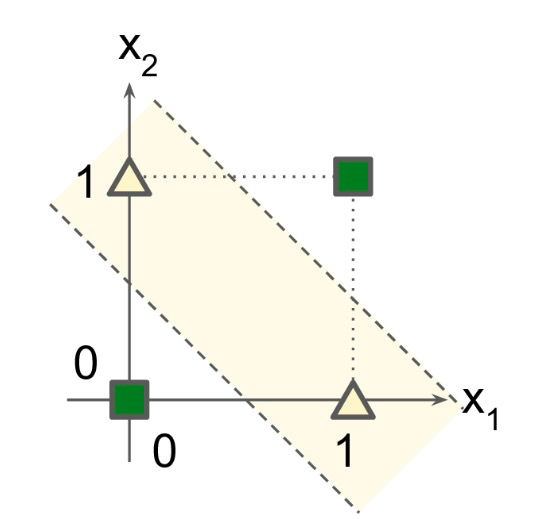
如上图所示,由于异或门不是线性可分的,因此需要多层感知器的结构。
使用两层感知器可以实现异或门。
修改test_perception。py文件,加入异或门的测试代码:
以及