Android利用ClockService实现一个定时闹钟功能


Android利用ClockService实现一个定时闹钟功能?针对这个问题,这篇文章详细介绍了相对应的分析和解答,希望可以帮助更多想解决这个问题的小伙伴找到更简单易行的方法。

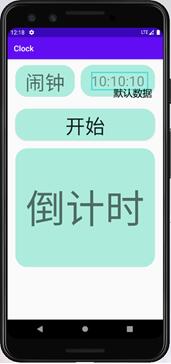
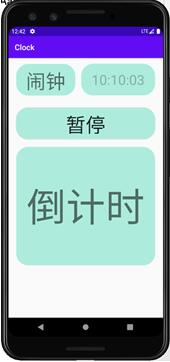
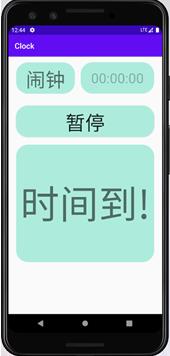
创建ClockActivity,可输入一个时间(使用Time文本框),再创建一个ClockService在用于计时,到时间后,以在Activity中发出通知(在下方的TextView中显示“时间到”)。

这里涉及到了Service操作Activity

Android利用ClockService实现一个定时闹钟功能

Android利用ClockService实现一个定时闹钟功能

Android利用ClockService实现一个定时闹钟功能

实验步骤:使用BoundService方式开启服务

1、首先定义布局文件,这里不做过多赘述

Android利用ClockService实现一个定时闹钟功能

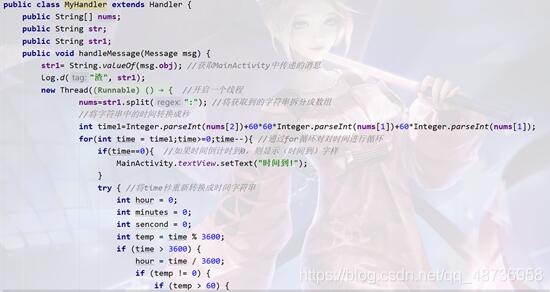
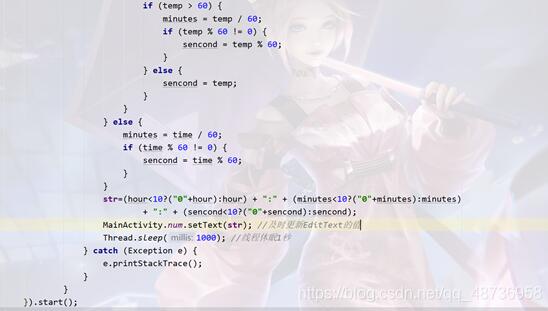
3、 定义一个Service服务类,然后在类里面定义一个MyBinder的内部类,用于获取Service对象与Service对象状态。在内部类中必须要实现的方法onBind方法返回MyBinder服务对象。在内部类中定义一个getHandler方法获取Handler对象用于MainActivity和MyService之间的消息传递。
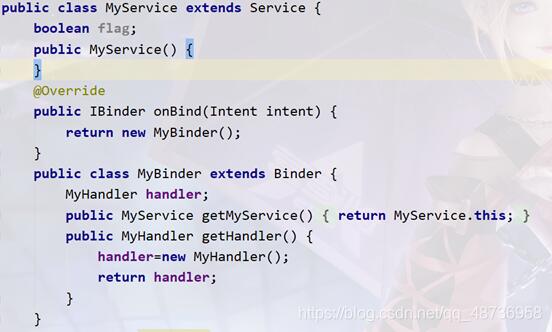
Android利用ClockService实现一个定时闹钟功能

Handler消息传递关键代码如下:

Android利用ClockService实现一个定时闹钟功能

Android利用ClockService实现一个定时闹钟功能

4、 创建MainActivity中的单击事件

Android利用ClockService实现一个定时闹钟功能

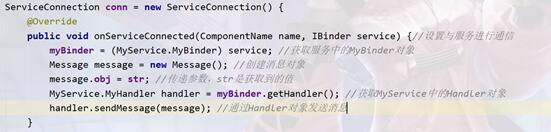
5、服务的绑定需要创建ServiceConnection对象并实现相应的方法,然后在重写的onServiceConnected方法中获取后台Service,代码如下:

Android利用ClockService实现一个定时闹钟功能

- Activity_main.xml代码:

& lt;及# 63;xml version=?.0”;编码=皍tf-8", # 63;比;   http://schemas.android.com/apk/res/android" & lt; LinearLayout xmlns: android=?;   xmlns:工具=癶ttp://schemas.android.com/tools"   android: layout_width=癿atch_parent"   android: layout_height=癿atch_parent"   android:取向=皏ertical"比;      LinearLayout & lt;   android: layout_width=癿atch_parent"   android: layout_height=?10 dp"   android: layout_marginHorizontal=?0 dp"   android:取向=癶orizontal"比;      & lt; TextView   android: layout_width=?50 dp"   android: layout_height=?0 dp"   android: layout_marginTop=?5 dp"   android:背景=癅drawable/shape"   android:重力=癱enter_horizontal"   android:文本=澳种印?   android: textAlignment=癱enter"   android: textSize=?0 sp"祝辞& lt;/TextView>      EditText & lt;   android: autofillHints=皌rue"   android:提示=?0:10:10"   android: id=癅 + id/num"   android: layout_width=癿atch_parent"   android: layout_height=?0 dp"   android: layout_marginLeft=?5 dp"   android: layout_marginTop=? dp"   android:背景=癅drawable/shape"   android:重力=癱enter"   android: inputType=皌ime"   android: textSize=?5 sp"祝辞& lt;/EditText>   & lt;/LinearLayout>      & lt;按钮   android: id=癅 + id/btnStart"   android: layout_width=癿atch_parent"   android: layout_height=?0 dp"   android: layout_marginHorizontal=?0 dp"   android: layout_marginTop=?5 dp"   android:背景=癅drawable/shape"   android:文本=翱肌?   android: textSize=?0 sp"祝辞& lt;/Button>      & lt; TextView   android: id=癅 + id/text1"   android: layout_width=癿atch_parent"   android: layout_height=?00 dp"   android: layout_margin=?0 dp"   android:背景=癅drawable/shape"   android:重力=癱enter"   android:文本=暗辜剖薄?   android: textSize=?00 sp"祝辞& lt;/TextView>   & lt;/LinearLayout>

——MyService。java代码

包com.example.clock;
  进口android.app.Service;
  进口android.content.Intent;
  进口android.os.Binder;
  进口handler;
  进口android.os.IBinder;
  进口android.os.Message;
  进口android.util.Log;
  进口android.widget.EditText;
  公开课MyService延伸服务{
  公共MyService () {
  }
  @Override
  公共内部>包com.example.clock;
  
  进口androidx.appcompat.app.AppCompatActivity;
  
  进口android.content.ComponentName;
  进口android.content.Intent;
  进口android.content.ServiceConnection;
  进口android.os.Binder;
  进口android.os.Bundle;
  进口handler;
  进口android.os.IBinder;
  进口android.os.Message;
  进口android.util.Log;
  进口android.view.View;
  进口android.widget.Button;
  进口android.widget.EditText;
  进口android.widget.TextView;
  
  公开课MainActivity延伸AppCompatActivity {
  MyService。MyBinder MyBinder;
  公共静态EditText num;
  int国旗=0;
  字符串str;
  目的意图;
  公共静态TextView TextView;
  @Override
  保护空白>关于Android利用ClockService实现一个定时闹钟功能问题的解答就分享到这里了,希望以上内容可以对大家有一定的帮助,如果你还有很多疑惑没有解开,可以关注行业资讯频道了解更多相关知识。

Android利用ClockService实现一个定时闹钟功能