介绍
本篇文章为大家展示了springboot中配置使用swagger2的方法,内容简明扼要并且容易理解,绝对能使你眼前一亮,通过这篇文章的详细介绍希望你能有所收获。
<强> 1。maven依赖包
使用目前最新版本为例,砰的一声。xml添加的代码如下
包cn.smileyan.swagger.config;

  进口org.springframework.beans.factory.annotation.Configurable;
  进口org.springframework.context.annotation.Bean;
  进口springfox.documentation.builders.ApiInfoBuilder;
  进口springfox.documentation.builders.PathSelectors;
  进口springfox.documentation.builders.RequestHandlerSelectors;
  进口springfox.documentation.service.ApiInfo;
  进口springfox.documentation.spi.DocumentationType;
  进口springfox.documentation.spring.web.plugins.Docket;
  进口springfox.documentation.swagger2.annotations.EnableSwagger2;

  @EnableSwagger2
  @Configurable
  公开课Swagger2 {/* *
  *特别要注意.apis (RequestHandlerSelectors.basePackage (“cn.smileyan.swagger.controller"))
  *此中的cn.smileyan.swagger.controller一定要修改为自己控制器包。
  * @return
  */@ bean
  公共摘要createRestApi () {
  返回新摘要(DocumentationType.SWAGGER_2)
  .apiInfo (apiInfo ())
  .select ()
  .apis (RequestHandlerSelectors.basePackage (“cn.smileyan.swagger.controller"))
  .paths (PathSelectors.any ())
  .build ();
  }

  私人ApiInfo ApiInfo () {
  返回新ApiInfoBuilder () .title (“springboot使用的例子“)
  .description(“简单优雅的restful风格“)
  .termsOfServiceUrl (“https://smileyan.cn")
  .version (“1.0”)
  .build ();
  }
  }
不能忘记类前面的@EnableSwagger2与@Configurable配置注解。以及后面@ bean注的解。
<强> 3。@EnableSwagger2不能忘了
除了这个位置需要添加这个注解,还有springboot的运行类(应用程序类)也要添加这个注释,否则会出现错误。
如图所示,我的应用程序类名为SwaggerApplication,在这个类上面添加@EnableSwagger2
包cn.smileyan.swagger;

  进口org.springframework.boot.SpringApplication;
  进口org.springframework.boot.autoconfigure.SpringBootApplication;
  进口springfox.documentation.swagger2.annotations.EnableSwagger2;

  @SpringBootApplication
  @EnableSwagger2
  公开课SwaggerApplication {

  公共静态void main (String [] args) {
  SpringApplication.run (SwaggerApplication.class, args);
  }
  }
4。编写控制器类,添加注解,注意这个控制器路径与上面配置类的路径要保持一致。
包cn.smileyan.swagger.controller;
进口io.swagger.annotations.ApiOperation;
进口org.springframework.web.bind.annotation.RequestMapping;
进口org.springframework.web.bind.annotation.RequestMethod;
进口org.springframework.web.bind.annotation.RestController;
进口java.util.HashMap;
进口java.util.Map;
@RestController
@RequestMapping (“/user")
公开课用户控件{
@ApiOperation(值=https://www.yisu.com/zixun/庇没Р馐浴?指出=肮蟊鲇没А?
@RequestMapping (value="、方法=RequestMethod.GET)
私人Map getUser () {
Map 地图=new HashMap <> (1);
map.put(“结果”,“成功”);
返回地图;
}
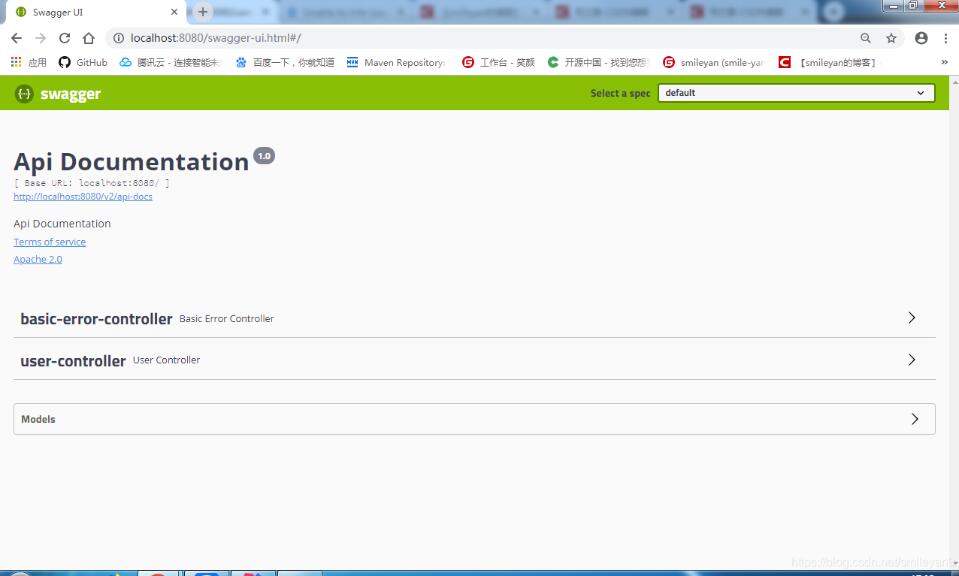
} 5。运行,打开api文档http://localhost: 8080/swagger-ui。html
效果如下:
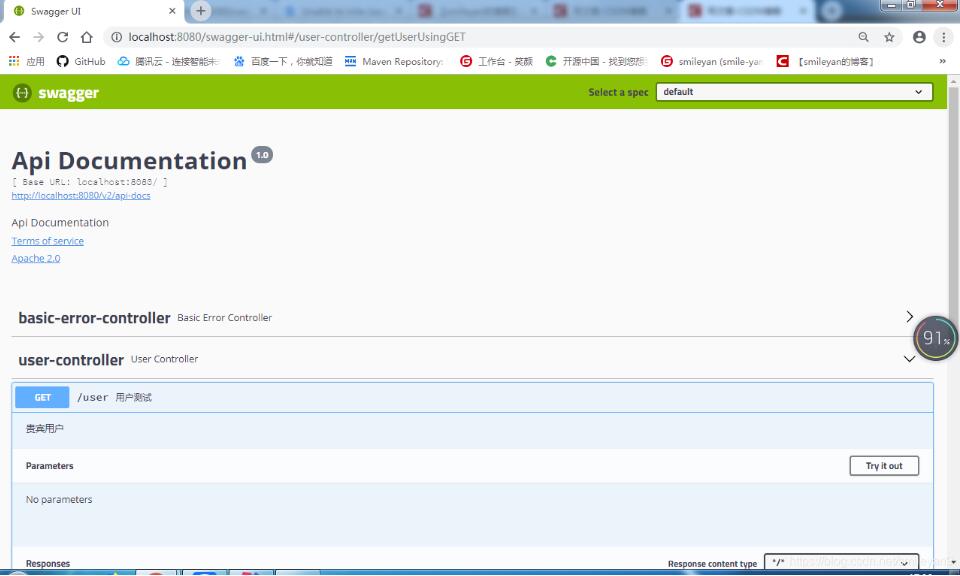
可以点开用户控制器,效果如下: