学习https://matplotlib.org/gallery/index.html记录,描述不一定准确,具体请参考官网
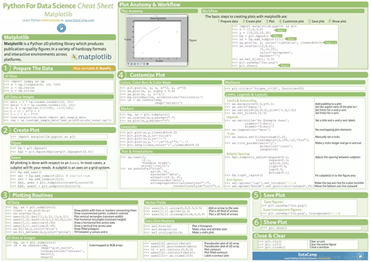
Matplotlib使用总结图
进口matplotlib。pyplot作为plt
plt.rcParams['字体。无衬线']=[' SimHei '] #用来正常显示中文标签
plt.rcParams['轴。unicode_minus ']=False #用来正常显示负号
熊猫作为pd导入
进口numpy np
<强>新建隐藏坐标轴
从mpl_toolkits.axisartist。axislines进口SubplotZero
进口numpy np
无花果=plt。6)图(1)(10日)
ax=SubplotZero(无花果,1,1,1)
fig.add_subplot (ax)
”““新建坐标轴”“”
ax.axis (“xzero”) .set_visible(真正的)
ax.axis .label.set_text (“xzero”)(“新建y=0坐标”)
ax.axis .label.set_color (“xzero”)(“绿色”)
# ax.axis [' yzero '] .set_visible(真正的)
# ax.axis .label.set_text (“yzero”)(“新建x=0坐标”)
#新建一条y=2横坐标轴
斧子。轴(“新建1”]=ax。new_floating_axis (nth_coord=0, value=https://www.yisu.com/zixun/2, axis_direction=暗撞俊?
ax.axis["新建1”).toggle(所有=True)
.label ax.axis["新建1”)。set_text (" y=2横坐标”)
ax.axis["新建1”).label.set_color(蓝色)
”“坐标箭头”“”
ax.axis .set_axisline_style (“xzero”)(“- |比;”)
””“隐藏坐标轴”“”
#方法一:隐藏上边及右边
(“正确”)# ax.axis .set_visible(假)
(“顶级”)# ax.axis .set_visible(假)
#方法二:可以一起写
ax.axis(“顶级”、“正确”的).set_visible(假)
#方法三:利用的
#为n(“底”,“顶”,“正确的”):
# ax.axis [n] .set_visible(假)
”““设置刻度”“”
斧子。set_ylim (3)
ax.set_yticks ([1, -0.5, 0、0.5、1])
斧子。set_xlim ([5、8])
# ax.set_xticks ([5、5、1])
#设置网格样式
斧子。网格(真的,线型=?”。)
xx=np。(4,2 * np不等。π,0.01)
斧子。情节(xx np.sin (xx))
#于抵消处新建一条纵坐标
偏移量=(40,0)
.new_fixed_axis new_axisline=ax.get_grid_helper ()
斧子。轴(“新建2”]=new_axisline (loc=罢贰?抵消=抵消轴=ax)
ax.axis["新建2”].label.set_text(“新建纵坐标”)
ax.axis["新建2”].label.set_color(“红”)
plt.show ()
#存为图像
# fig.savefig (test.png)

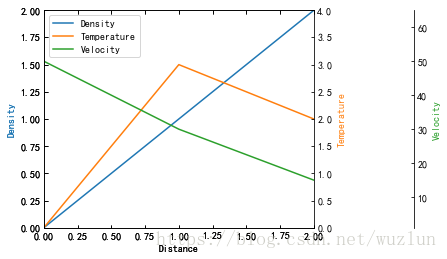
从mpl_toolkits。axes_grid1进口host_subplot
进口mpl_toolkits。axisartist作为AA
进口matplotlib。pyplot作为plt
主机=host_subplot(111年,axes_class=AA.Axes)
plt.subplots_adjust(右=0.75)
par1=host.twinx ()
par2=host.twinx ()
抵消=100
.new_fixed_axis new_fixed_axis=par2.get_grid_helper ()
par2。轴(“正确”)=new_fixed_axis (loc=罢贰?
轴=par2,
偏移量=(抵消,0))
par1.axis(“正确”).toggle(所有=True)
par2.axis(“正确”).toggle(所有=True)
宿主set_xlim (0, 2)
宿主set_ylim (0, 2)
host.set_xlabel(“距离”)
host.set_ylabel(“密度”)
par1.set_ylabel(“温度”)
par2.set_ylabel(“速度”)
p1,=主机。情节((0,1,2)(0,1,2),标签=懊芏取?
p2,=par1。情节([0 1 2],[0 3 2],标签=拔露取?
p3,=par2。情节([0 1 2],[15]50岁,30日,标签=八俣取?
par1。set_ylim (0, 4)
par2。set_ylim (65)
host.legend ()
(“左”)host.axis .label.set_color (p1.get_color ())
par1.axis(“正确”).label.set_color (p2.get_color ())
par2.axis(“正确”).label.set_color (p3.get_color ())
plt.draw ()
plt.show ()
#第二坐标
无花果,ax_f=plt.subplots ()
#这步是关键
ax_c=ax_f.twinx ()
ax_d=ax_f.twiny ()
#时自动更新ylim ax2 ylim ax?变化。
# ax_f.callbacks。连接(“ylim_changed”, convert_ax_c_to_celsius)
ax_f.plot (np。linspace (-40、120、100))
ax_f。set_xlim (0, 100)
# ax_f。set_title(“第二坐标”,大?14)
ax_f.set_ylabel (Y轴,颜色=' r ')
ax_f.set_xlabel (X轴,颜色=' c ')
ax_c。set_ylabel(“第二Y轴”,颜色=" b ")
ax_c。set_yticklabels ([$ 0 $“r”美元\压裂{1}{2}\π”美元,r \π美元,r”美元\压裂{3}{2}\π”美元,r“2 \π”美元))
# ax_c.set_ylim (1、5)
ax_d。set_xlabel(“第二X轴的,颜色=' g ')
ax_d.set_xlim (1, 1)
plt.show ()


