本文实例讲述了Android编程实现圆角边框布局效果的方法。分享给大家供大家参考,具体如下:
这里用的是TableLayout布局的。先看效果图
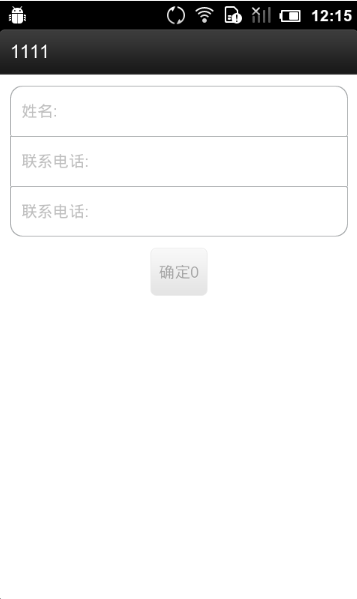
下面看下布局文件
& lt; & # 63; xml version=" 1.0 " encoding=" utf - 8 " & # 63;比;
& lt; LinearLayout xmlns: Android=" http://schemas.android.com/apk/res/android "
android: layout_width="宽和"
android: layout_height="宽和"
android:背景=" # FFFFFF "
面向android:=按怪薄北?
& lt; !——表格布局——比;
& lt; TableLayout
android: layout_width="宽和"
android: layout_height=" wrap_content "
android:填充=" 10浸”比;
& lt; !——表格布局:第一行——比;
& lt; TableRow
android: layout_width="宽和"
android: layout_height=" wrap_content "
android:背景=" @drawable/shape_top_corner_no_bottom_line”
android:填充=" 10浸”比;
& lt; TextView
android: layout_width=" wrap_content "
android: layout_height=" wrap_content "
android: layout_gravity=" center_vertical "
android: layout_marginRight=" 10底”
android:文本="姓名:“比;
& lt;/TextView>
EditText & lt;
android: id=癅 + id/bankingYourNameEditText”
android: layout_width=" wrap_content "
android: layout_height=" wrap_content "
android: layout_gravity=" center_vertical "
android: layout_weight=" 1 "
android:背景=" @null "
android:单行模式=" true "比;
& lt;/EditText>
& lt;/TableRow>
& lt; !——表格布局:第二行——比;
& lt; TableRow
android: layout_width="宽和"
android: layout_height=" wrap_content "
android:背景=" @drawable/shape_no_corner_without_bottom”
android:填充=" 10浸”比;
& lt; TextView
android: layout_width=" wrap_content "
android: layout_height=" wrap_content "
android: layout_gravity=" center_vertical "
android: layout_marginRight=" 10底”
android:文本="联系电话:“比;
& lt;/TextView>
EditText & lt;
android: id=癅 + id/bankingContactTelEditText”
android: layout_width=" wrap_content "
android: layout_height=" wrap_content "
android: layout_gravity=" center_vertical "
android: layout_weight=" 1 "
android:背景=" @null "
android: inputType="电话"
android:单行模式=" true "比;
& lt;/EditText>
& lt;/TableRow>
& lt; !——表格布局:第三行——比;
& lt; TableRow
android: layout_width="宽和"
android: layout_height=" wrap_content "
android:背景=" @drawable/shape_bottom_corner_no_top_line”
android:填充=" 10浸”比;
& lt; TextView
android: layout_width=" wrap_content "
android: layout_height=" wrap_content "
android: layout_gravity=" center_vertical "
android: layout_marginRight=" 10底”
android:文本="联系电话:“比;
& lt;/TextView>
EditText & lt;
android: id=癅 + id/bankingContactTelEditText”
android: layout_width=" wrap_content "
android: layout_height=" wrap_content "
android: layout_gravity=" center_vertical "
android: layout_weight=" 1 "
android:背景=" @null "
android: inputType="电话"
android:单行模式=" true "比;
& lt;/EditText>
& lt;/TableRow>
& lt;/TableLayout>
& lt;按钮
android: id=癅 + id/button1”
android: layout_width=" wrap_content "
android: layout_height=" wrap_content "
android: layout_gravity="中心"
android:文本=鞍磁ァ?比;
& lt;/LinearLayout>
之前
表格布局中每个TableRow表示一行,TableRow中的每个基本控件都是一列,这是一个三行两列的布局
这里的表格背景是自定义的形状、下面分别看一下三个形状的代码。
shape_top_corner_no_bottom_line。xml文件:顶部带圆角白色背景灰色边框无下边框长方体
& lt; & # 63; xml version=" 1.0 " encoding=" utf - 8 " & # 63;比;
& lt; !——顶部带圆角白色背景灰色边框无下边框长方体——比;
& lt; layer-list xmlns: android=" http://schemas.android.com/apk/res/android "比;
& lt; item>
& lt; shape>
& lt;固体android:颜色=" # FFFFFF "/比;
& lt;角落android: topLeftRadius=" 10 dp”android: topRightRadius=?0 dp”
android: bottomRightRadius=" 0.1 dp " android: bottomLeftRadius=" 0.1 dp/比;
& lt;中风android:宽度=" 1 dp“android:颜色=" # ffa8abad "/比;
& lt;/shape>
& lt;/item>
& lt;项目android:顶级=" 1 dp“android:左=? dp”android:右=? dp”比;
& lt; shape>
& lt;固体android:颜色=" # FFFFFF "/比;
& lt;角落android: topLeftRadius=" 10 dp”android: topRightRadius=?0 dp”
android: bottomRightRadius=" 0.1 dp " android: bottomLeftRadius=" 0.1 dp/比;
& lt;中风android:宽度=" 1 dp“android:颜色=" # ffffffff "/比;
& lt;/shape>
& lt;/item>
& lt;/layer-list>


