本文实例为大家分享了Android实现EventBus登录界面与传值的具体代码,供大家参考,具体内容如下
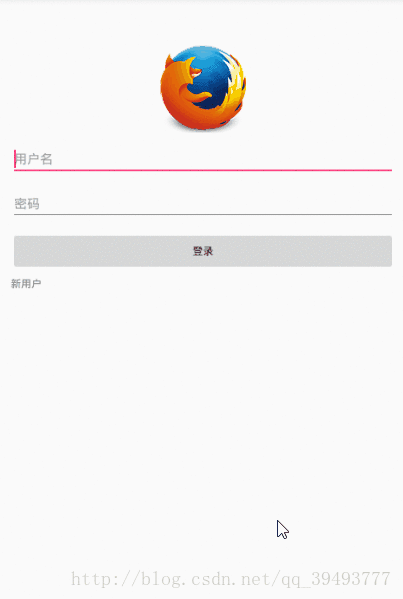
展示效果
添加EventBus导入依赖
编译“org.greenrobot: eventbus: 3.0.0”
之前
主MainActivity方法
公开课MainActivity延伸AppCompatActivity {
EditText私人用户名、密码;
私人按钮btn_go;
私人Listmdata;
@Override
保护空白>
公开课MainBctivity延伸AppCompatActivity {
私人按钮btn_shou;
私人TextView tv_b;
@Override
保护空白>
公开课UserEvent {
私人字符串的用户名;
私人字符串passwork;
公共UserEvent(用户名的字符串,字符串passwork) {
这一点。用户名=用户名;
这一点。passwork=passwork;
}
公共字符串getUsername () {
返回用户名;
}
公共空间setUsername(字符串的用户名){
这一点。用户名=用户名;
}
公共字符串getPasswork () {
返回passwork;
}
公共空间setPasswork(字符串passwork) {
这一点。passwork=passwork;
}
公共UserEvent () {
}
@Override
公共字符串toString () {
返回“UserEvent {”+
“用户名=" +用户名\“+ +”
”,passwork=" + passwork \“+ +”
'} ';
}
}
之前
activity_main (MainActivity的布局)
& lt;使用
android: layout_width=" match_parent "
android: layout_height=癿atch_parent”比;
& lt; ImageView
android: id=癅 + id/hh_img”
android: layout_width=" wrap_content "
android: layout_height=" wrap_content "
android: src=" https://www.yisu.com/zixun/@mipmap/标志”
android: layout_centerHorizontal=" true "
android: layout_marginTop=" 40 dp "/比;
EditText & lt;
android: id=癅 + id/用户名”
android: layout_below=" @ id/hh_img”
android: layout_width=" match_parent "
android: layout_height=" wrap_content "
android: layout_marginTop=" 10 dp”
android:提示="用户名”/比;
EditText & lt;
android: id=癅 + id/passwork”
android: layout_width=" match_parent "
android: layout_height=" wrap_content "
android: layout_below=" @ id/用户名”
android: layout_marginTop=" 10 dp”
android:提示="密码”/比;
& lt;按钮
android: id=癅 + id/btn_go”
android: layout_below=" @ id/passwork”
android: layout_marginTop=" 10 dp”
android: layout_width=" match_parent "
android: layout_height=" wrap_content "/比;
& lt; TextView
android: id=癅 + id/new_user”
android: layout_width=" wrap_content "
android: layout_height=" wrap_content "
android: layout_below=" @ id/btn_go”
android:文本="新用户”
android: layout_marginTop=" 5 px "/比;
& lt;/RelativeLayout>
之前
activity_main_bctivity (MainBctivity的布局)
& lt;按钮
android: layout_width=" wrap_content "
android: layout_height=" wrap_content "
android: layout_alignParentTop=" true "
android: layout_centerHorizontal=" true "
android: layout_marginTop=" 20 dp”
android: id=癅 + id/btn_shou”/比;
& lt; TextView
android: layout_width=" wrap_content "
android: layout_height=" wrap_content "
android: layout_below=癅 + id/btn_shou”
android: layout_centerHorizontal=" true "
android: layout_marginTop=" 32 dp "
android: id=癅 + id/tv_b”/比;
之前
以上就是本文的全部内容,希望对大家的学习有所帮助,也希望大家多多支持。


