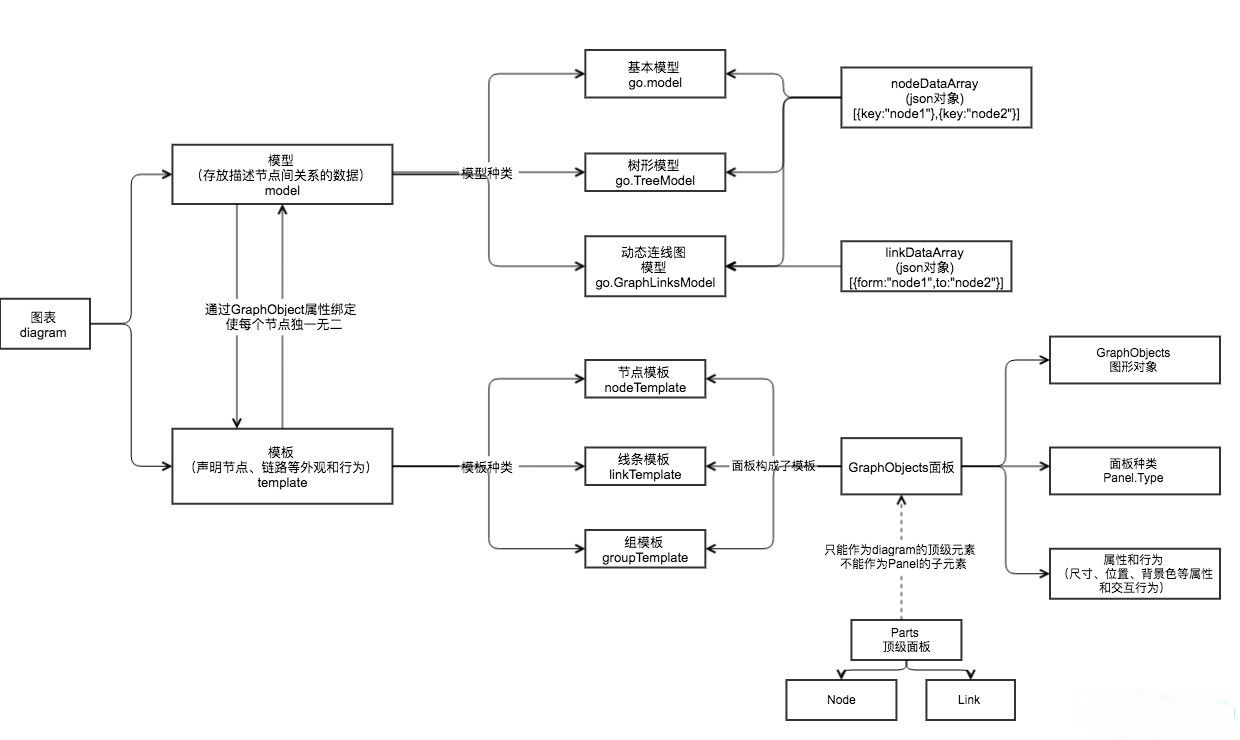
本文实例为大家分享了微信公众号扫一扫的具体代码,供大家参考,具体内容如下
<强>步骤
根据微信JS-JDK文档说明,实现扫一扫主要有以下几大步骤:
<李>绑定域名李
<李>引入JS文件
<李>通过配置接口注入权限验证配置李
<李>通过准备接口处理成功验证
<李>通过错误接口处理失败验证
李
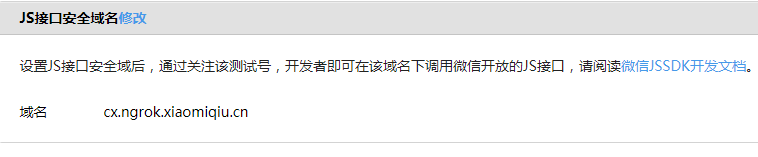
<>强绑定域名
在JS接口安全域名填入域名,注意不带http,如图:
<强>引入JS文件
& lt;脚本src=" http://res.wx.qq.com/open/js/jweixin-1.0.0.js "祝辞& lt;/script>
之前
通过配置接口注入权限验证配置
. ajax({美元
url:“$ {pageContext.request.contextPath}/微信/jsapisign”,
类型:“文章”,
数据:{
url: location.href.split (“#”) [0]
},
contentType:“应用程序/x-www-form-urlencoded; charset=utf - 8”,
异步:没错,
成功:功能(数据){
wx.config ({
调试:假的,
appId:数据。appid,//必填,公众号的唯一标识
时间戳:数据。时间戳,//必填,生成签名的时间戳
nonceStr:数据。nonceStr,//必填,生成签名的随机串
签名:数据。签名,//必填,签的名,见附录1
jsApiList (“scanQRCode”)://必填,需要使用的JS接口列表,所有JS接口列表见附录2
});
}
});
微信jsapi验签
公共Map<字符串,String>jsApiSign(字符串url) {
String> Map<字符串;ret=new HashMap<字符串,String> (16);
字符串nonce_str=CheckUtil.create_nonce_str ();
时间戳字符串=CheckUtil.create_timestamp ();
字符串string1;
字符串签名=" ";
字符串jsapi_ticket=wechatAccessTokenService.getJsApiTicket ();//注意这里参数名必须全部小写,且必须有序
string1=" jsapi_ticket=" + jsapi_ticket +
”,noncestr=" + nonce_str +
”,时间戳=" +时间+
“和url=" +网址;
logger.info (" jsApiSign===" + string1);
尝试{
MessageDigest地穴=MessageDigest.getInstance (sha - 1);
crypt.reset ();
crypt.update (string1.getBytes (" utf - 8 "));
签名=CheckUtil.byteToHex (crypt.digest ());
}捕捉(NoSuchAlgorithmException | UnsupportedEncodingException e) {
e.printStackTrace ();
}
ret.put (“appid”, appid);
ret.put (“url”, url);
ret.put (“jsapi_ticket”, jsapi_ticket);
ret.put (“nonceStr”, nonce_str);
ret.put(“时间戳”,时间戳);
ret.put(“签名”,签名);
logger.info (“jsApiSign url====" + url +==jsapi_ticket”+ jsapi_ticket +==nonce_str”+ nonce_str +==时间戳”+时间+==签名+签名);
返回受潮湿腐烂;
}
之前
公共字符串getJsApiTicket () {
AugeWechatAccessToken wechatAccesstoken=augeWechatAccessTokenMapper.selectByPrimaryKey (jsApiTicketId);
logger.info (" getJsApiTicket===" + wechatAccesstoken.getAccessToken ());
如果(Strings.isNullOrEmpty (wechatAccesstoken.getAccessToken ()) | | wechatAccesstoken.getExpiresIn () - 100 * 1000 & lt;System.currentTimeMillis ()) {//空或者过期,刷新
返回refreshJsApiTicket ();
其他}{
返回wechatAccesstoken.getAccessToken ();
}
}
控制器层代码
@RequestMapping (value=" https://www.yisu.com/jsapisign ",方法={RequestMethod。,RequestMethod。},产生=MEDIATYPE_CHARSET_JSON_UTF8)
@ResponseBody
jsApiSign公共字符串(字符串url) {//添加微信js签名信息
String> Map<字符串;signMap=wechatService.jsApiSign (url);
返回JSON.toJSONString (signMap);
}
之前
前台JSP页面完整代码
% @ & lt;页面contentType=" text/html; charset=utf - 8”语言=癹ava”%比;
& lt; %
字符串路径=request.getContextPath ();
字符串basePath=request.getScheme () +”://? request.getServerName () +“:”+ request.getServerPort() +路径“/?
%比;
& lt; !DOCTYPE HTML公共”——//W3C//DTD HTML 4.01过渡//EN”比;
& lt; html lang=坝τ谩北?
& lt;元charset=皍tf - 8”比;
& lt;元http-equiv=癤-UA-Compatible”内容=癐E=边缘”比;
& lt;元name=笆哟啊蹦谌?翱矶?320.1,初始=1,最小规模=1,最大范围=1,user-scalable=不”比;
& lt; head>
& lt;基地href=" https://www.yisu.com/zixun/" rel=巴獠縩ofollow”比;
& lt; title>扫码还书& lt;/title>
& lt;链接rel="样式表" href=" http://203.195.235.76/jssdk/css/style.css "/比;
& lt;脚本src=" http://res.wx.qq.com/open/js/jweixin-1.1.0.js "祝辞& lt;/script>
& lt;脚本src=" http://libs.baidu.com/jquery/2.0.0/jquery.js "祝辞& lt;/script>
& lt;链接rel="样式表" type=" text/css " href=" https://www.yisu.com/resources/css/bookdetail.css " rel=巴獠縩ofollow”比;
& lt;/head>
& lt; body>
& lt; div类="包装"比;
& lt; img src=" https://www.yisu.com/resources/images/borrow/return.png " alt="比;
& lt; div比;
& lt; img src=" https://www.yisu.com/resources/images/borrow/scanReturn.png " alt=" id=皊canQRCode1”比;
& lt;/div>
& lt;/div>
& lt;脚本type=" text/javascript祝辞
. ajax({美元
url:“$ {pageContext.request.contextPath}/微信/jsapisign”,
类型:“文章”,
数据:{
url: location.href.split (“#”) [0]
},
contentType:“应用程序/x-www-form-urlencoded; charset=utf - 8”,
异步:没错,
成功:功能(数据){
wx.config ({
调试:假的,
appId:数据。appid,//必填,公众号的唯一标识
时间戳:数据。时间戳,//必填,生成签名的时间戳
nonceStr:数据。nonceStr,//必填,生成签名的随机串
签名:数据。签名,//必填,签的名,见附录1
jsApiList (“scanQRCode”)://必填,需要使用的JS接口列表
});
}
});
wx。准备好(函数(){//9.1.2扫描二维码并返回结果
document.querySelector (“# scanQRCode1”)。onclick=function () {
wx.scanQRCode ({
needResult: 1、
描述:“scanQRCode desc”,
null
null
null
null
null
null
null
null
null
null
null
null
null
null
null
null
null
null
null
null
null
null
null
null
null
null
null
null
null