使用SpringBoot进行文件上传的方法和SpringMVC差不多,本文单独新建一个最简单的演示来说明一下。
主要步骤包括:
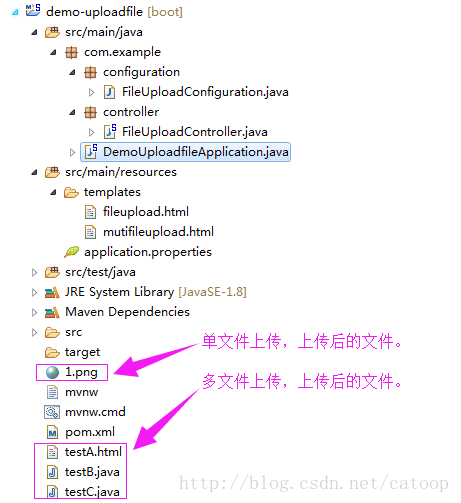
1,创建一个springboot项目工程,本例名称(demo-uploadfile)。
2,配置砰的一声。xml依赖。
3,创建和编写文件上传的控制器(包含单文件上传和多文件上传)。
4,创建和编写文件上传的HTML测试页面。
5,文件上传相关限制的配置(可选)。
6,运行测试。
项目工程截图如下:
文件代码:
& lt; dependencies>
& lt; !——春天引导网络支持——比;
& lt; dependency>
& lt; groupId> org.springframework.boot
& lt; artifactId> spring-boot-starter-web
& lt;/dependency>
& lt; !——thmleaf模板依赖。——比;
& lt; dependency>
& lt; groupId> org.springframework.boot
& lt; artifactId> spring-boot-starter-thymeleaf
& lt;/dependency>
& lt; dependency>
& lt; groupId> org.springframework.boot
& lt; artifactId> spring-boot-starter-test
& lt; scope> test
& lt;/dependency>
& lt;/dependencies>
包com.example.controller;
进口java.io.BufferedOutputStream;
进口java.io.File;
进口java.io.FileNotFoundException;
进口java.io.FileOutputStream;
进口java.io.IOException;
进口并不知道;
进口javax.servlet.http.HttpServletRequest;
进口org.springframework.stereotype.Controller;
进口org.springframework.web.bind.annotation.RequestMapping;
进口org.springframework.web.bind.annotation.RequestMethod;
进口org.springframework.web.bind.annotation.RequestParam;
进口org.springframework.web.bind.annotation.ResponseBody;
进口org.springframework.web.multipart.MultipartFile;
进口org.springframework.web.multipart.MultipartHttpServletRequest;/* *
*文件上传的控制器
*
* @author单红宇(CSDN CATOOP)
* @create 2017年3月11日
*/@ controller
公开课FileUploadController {//访问路径为:http://ip上传
@RequestMapping (value=" https://www.yisu.com/upload ",方法=RequestMethod.GET)
公共字符串上传(){
返回"/fileupload”;
}//访问路径为:http://ip上传/批处理
@RequestMapping (value=" https://www.yisu.com/upload/batch ",方法=RequestMethod.GET)
公共字符串batchUpload () {
返回"/mutifileupload”;
}/* *
*文件上传具体实现方法(单文件上传)
*
* @param文件
* @return
*
* @author单红宇(CSDN CATOOP)
* @create 2017年3月11日
*/@RequestMapping (value=" https://www.yisu.com/upload ",方法=RequestMethod.POST)
@ResponseBody
公共字符串上传(@RequestParam(“文件”)MultipartFile文件){
如果(! file.isEmpty ()) {
尝试{//这里只是简单例子,文件直接输出到项目路径下。//实际项目中,文件需要输出到指定位置,需要在增加代码处理。//还有关于文件格式限制,文件大小限制,详见:中配置。
BufferedOutputStream=new BufferedOutputStream (
新FileOutputStream(新文件(file.getOriginalFilename ())));
out.write (file.getBytes ());
out.flush ();
out.close ();
}捕捉(FileNotFoundException e) {
e.printStackTrace ();
回报”上传失败”+ e.getMessage ();
}捕捉(IOException e) {
e.printStackTrace ();
回报”上传失败”+ e.getMessage ();
}
回报”上传成功”;
其他}{
回报”上传失败,因为文件是空的。”;
}
}/* *
*多文件上传主要是使用了MultipartHttpServletRequest和MultipartFile
*
* @param请求
* @return
*
* @author单红宇(CSDN CATOOP)
* @create 2017年3月11日
*/@RequestMapping (value=" https://www.yisu.com/upload/batch ",方法=RequestMethod.POST)
公共@ResponseBody字符串batchUpload (HttpServletRequest请求){
List文件=((MultipartHttpServletRequest)请求).getFiles(“文件”);
MultipartFile文件=零;
BufferedOutputStream流=零;
for (int i=0;我& lt;files.size ();+ + i) {
文件=files.get(我);
如果(! file.isEmpty ()) {
尝试{
byte[]字节=file.getBytes ();
流=new BufferedOutputStream(新FileOutputStream(新文件(file.getOriginalFilename ())));
stream.write(字节);
stream.close ();
}捕捉(异常e) {
流=零;
返回“你未能上传+我+=比;“+ e.getMessage ();
}
其他}{
返回“你未能上传”+我+”,因为文件是空的。”;
}
}
返回“上传成功”;
}
}