介绍 import matplotlib.pyplot as plt
得到matplotlib.font_manager import FontProperties def GetFeatureList (full_path_file):
file_name 才能=,full_path_file.split (& # 39; \ \ & # 39;) [1] [0:4]
#,才能打印(file_name)
#,才能打印(full_name)
时间=K0_list 才能;[]
时间=Area_list 才能;[]
时间=all_lines 才能;[]
f =,开放才能(full_path_file & # 39; " # 39;)
时间=all_lines 才能;f.readlines ()
lines_num 才能=,len (all_lines)
#,才能数据清洗
if 才能;lines_num 祝辞,5000:
,,,for 小姐:拷贝范围(3 lines_num-1):
,,,,,temp_k0 =, int (all_lines[我].split (& # 39; \ t # 39;) [1])
,,,,,if temp_k0 ==, 0:
,,,,,,,K0_list.append (ComputK0 (all_lines[我]))
,,,,,其他的:
,,,,,,,K0_list.append (temp_k0)
,,,,,Area_list.append(浮动(all_lines[我].split (& # 39; \ t # 39;) [15]))
,,,#,K0_Scatter (K0_list、Area_list file_name)
其他的才能:
,,,print(& # 39;{},该样本量少于5000 & # 39;.format (file_name))
return 才能;K0_list, Area_list, file_name def K0_Scatter (K0_list, Area_list,, pic_name):
plt.figure才能(figsize=(25, 10),, dpi=300)
#,才能导入中文字体,及字体大小
时间=zhfont 才能;FontProperties(?& # 39;C:/Windows/字体/simsun.ttc& # 39;,,大?16)
时间=ax 才能;plt.subplot (211)
#,才能打印(K0_list)
ax.scatter才能(范围(len (K0_list)), K0_list,, c=& # 39; " # 39;,,标志=& # 39;o # 39;)
plt.title才能(u # 39;散点图& # 39;,,fontproperties=zhfont)
plt.xlabel才能(& # 39;Sampling 点# 39;,,fontproperties=zhfont)
plt.ylabel才能(& # 39;K0_value& # 39;,, fontproperties=zhfont)
时间=ax 才能;plt.subplot (212)
ax.scatter才能(范围(len (area_list)), area_list,, c=& # 39; b # 39;,,标志=& # 39;o # 39;)
plt.xlabel才能(& # 39;Sampling 点# 39;,,fontproperties=zhfont)
plt.ylabel才能(u # 39;大小& # 39;,,fontproperties=zhfont)
plt.title才能(u # 39;散点图& # 39;,,fontproperties=zhfont)
#,才能imgname =, & # 39; E: \ \ & # 39;, +, pic_name +, & # 39; . png # 39;
#,才能plt.savefig (imgname, bbox_inches =, & # 39;紧# 39;)
plt.show才能() def K0_Plot (X_label, Y_label,, pic_name):
plt.figure才能(figsize=(25, 10),, dpi=300)
#,才能导入中文字体,及字体大小
时间=zhfont 才能;FontProperties(?& # 39;C:/Windows/字体/simsun.ttc& # 39;,,大?16)
时间=ax 才能;plt.subplot (111)
#,才能打印(K0_list)
ax.plot才能(X_label, Y_label,, c=& # 39; " # 39;,,标志=& # 39;o # 39;)
plt.title才能(pic_name, fontproperties=zhfont)
plt.xlabel才能(& # 39;coal_name& # 39;,, fontproperties=zhfont)
plt.ylabel才能(pic_name, fontproperties=zhfont)
#,才能ax.xaxis.grid(真的,,,=& # 39;主要# 39;)
ax.yaxis.grid才能(真的,,,=& # 39;主要# 39;)
for 才能,,,b 拷贝zip (X_label, Y_label):
,,,str_label =, a +, str (b), +, & # 39; % & # 39;
,,,plt.text (a, b,, str_label,,哈=& # 39;中心# 39;,,va=& # 39;底部# 39;,,字形大?10)
时间=imgname 才能;& # 39;E: \ \ & # 39;, +, pic_name +, & # 39; . png # 39;
plt.savefig才能(imgname, bbox_inches =, & # 39;紧# 39;)
#,才能plt.show () def K0_MultPlot (dis_name, dis_lsit,, pic_name):
plt.figure才能(figsize=(80,, 10), dpi=300)
#,才能导入中文字体,及字体大小
时间=zhfont 才能;FontProperties(?& # 39;C:/Windows/字体/simsun.ttc& # 39;,,大?16)
时间=ax 才能;plt.subplot (111)
时间=X_label 才能;范围(len (dis_lsit [1]))
null
null
null
null
null
null
null
null
null
null
null
null
null
null
null
null
这篇文章将为大家详细讲解有关Python散点图与折线图怎么绘制,小编觉得挺实用的,因此分享给大家做个参考,希望大家阅读完这篇文章后可以有所收获。
在数据分析的过程中,经常需要将数据可视化,目前常使用的:散点图折线图
需要进口的外部包一个是绘图一个是字体导入
在数据处理前需要获取数据,从TXT XML csv excel等文本中获取需要的数据,保存到列表
绘制两组数据的散点图,同时绘制两个散点图,上下分布在同一个图片中
散点图显示

<强>绘制一个折线图每个数据增加标签
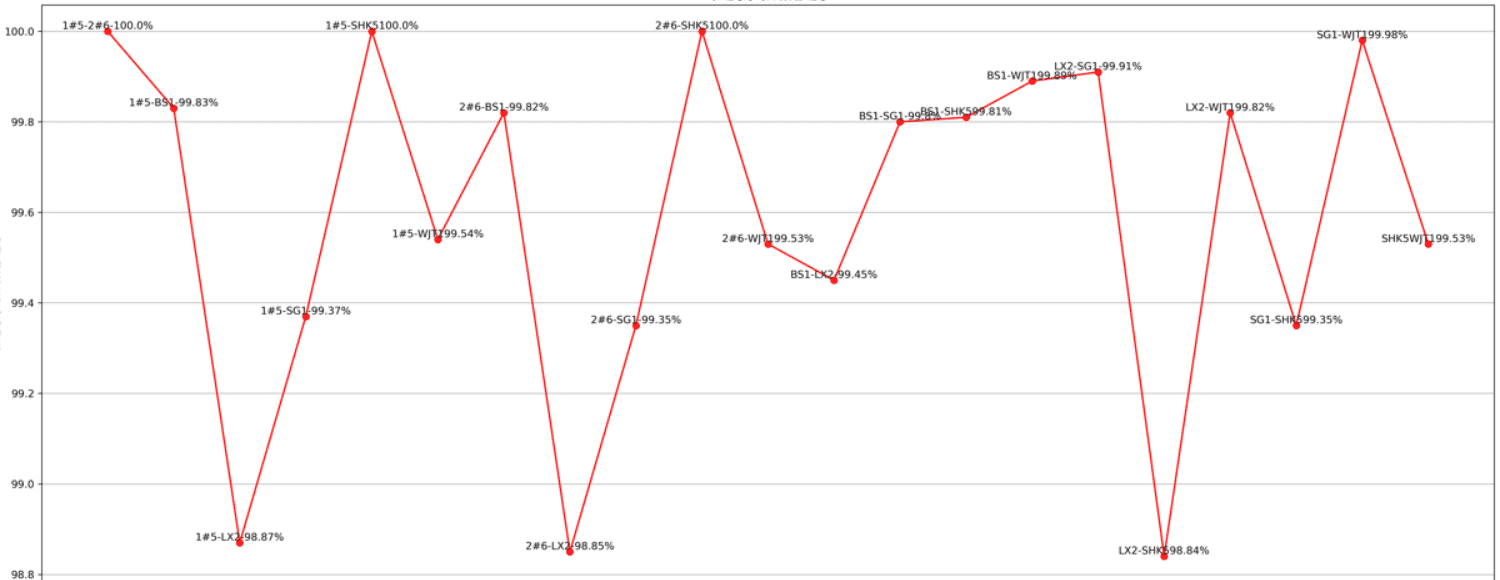
<强>绘制多条折线图