介绍 import matplotlib.pyplot as plt
import numpy as np
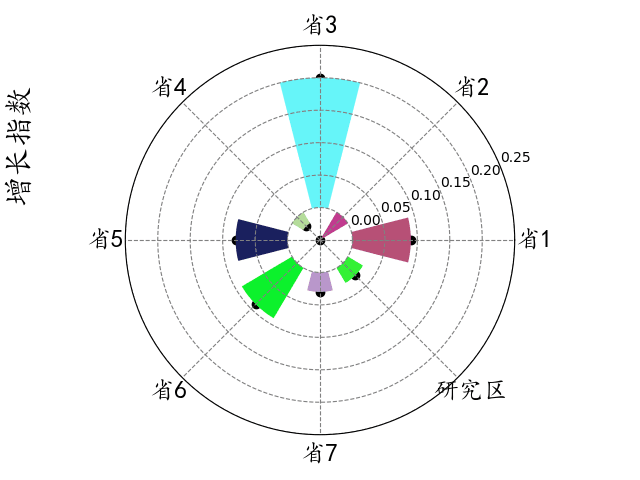
values =, (0.09, -0.05, 0.20, -0.02, 0.08, 0.09, 0.03, 0.027)
时间=x np.linspace (0 2 * np.pi 9) (: 1)
时间=c np.random.random(大?(8,3))
时间=fig plt.figure ()
plt.axes(极地=True)
#获取当前的轴
print (plt.gca ())
#绘图
plt.bar (x,价值观,宽度=0.5,颜色=c,对齐=& # 39;中心# 39;)
plt.scatter (x,价值观,标志=& # 39;o # 39;, c=& # 39;黑色# 39;)
#添加文本
plt.figtext (0.03, 0.7, s=& # 39;陆地面积增长指数& # 39;,fontproperties=& # 39; KaiTi& # 39;,字形大?22日旋转=& # 39;垂直# 39;,verticalalignment=& # 39;中心# 39;,horizontalalignment=& # 39;中心# 39;)
plt.ylim (-0.05, 0.25)
labels =, np.array([& # 39;省1 & # 39;,& # 39;省2 & # 39;,& # 39;省3 & # 39;,& # 39;省4 & # 39;,& # 39;省5 & # 39;,& # 39;省6 & # 39;,& # 39;省7 & # 39;,& # 39;研究区& # 39;])
dataLength =8
时间=angles np.linspace (0, 2 * np.pi,, dataLength,,端点=False)
plt.thetagrids (angles *, 180/np.pi,标签,fontproperties=& # 39; KaiTi& # 39;,字形大?18)
#添加注释
#,plt.annotate (s=& # 39;省& # 39;,xy=(0.09 0,), xytext=(0.28 0,), fontproperties=& # 39; KaiTi& # 39;,字形大?18)
#,plt.annotate (s=& # 39;省& # 39;,xy=(-0.05 0,), xytext=(np.pi/4、0.28), fontproperties=& # 39; KaiTi& # 39;,字形大?18)
#,plt.annotate (s=& # 39;省& # 39;,xy=(0.20 0,), xytext=(np.pi/2, 0.28), fontproperties=& # 39; KaiTi& # 39;,字形大?18)
#,plt.annotate (s=& # 39;省& # 39;,xy=(-0.02 0,), xytext=(3 * np.pi/4、0.33), fontproperties=& # 39; KaiTi& # 39;,字形大?18)
#,plt.annotate (s=& # 39;省& # 39;,xy=(0.08 0,), xytext=(np.pi, 0.38), fontproperties=& # 39; KaiTi& # 39;,字形大?18)
#,plt.annotate (s=& # 39;省& # 39;,xy=(0.09 0,), xytext=(np.pi * 5/4, 0.35), fontproperties=& # 39; KaiTi& # 39;,字形大?18)
#,plt.annotate (s=& # 39;前江省& # 39;,xy=(0.03 0,), xytext=(np.pi * 3/2, 0.30), fontproperties=& # 39; KaiTi& # 39;,字形大?18)
#,plt.annotate (s=& # 39;研究区& # 39;,xy=(0.027 0,), xytext=(np.pi * 7/4, 0.28), fontproperties=& # 39; KaiTi& # 39;,字形大?18)
#设置网格线样式
plt.grid (c=& # 39;灰色# 39;,线型=& # 39;——& # 39;,)=#,y1 [-0.05, 0.0, 0.05, 0.10, 0.15, 0.20, 0.25)
#,赖=fig.add_axes ([0.12, 0.01, 0.8, 0.98])
#,lai.patch.set_alpha (0.25)
#,lai.set_ylim (-0.05, 0.25)
#显示
plt.show () import matplotlib.pyplot as plt
import numpy as np
plt.rcParams [& # 39; font.sans-serif& # 39;],=, (& # 39; SimHei& # 39;), #,图例中文问题
plt.rcParams [& # 39; axes.unicode_minus& # 39;],=, False , #正负号问题
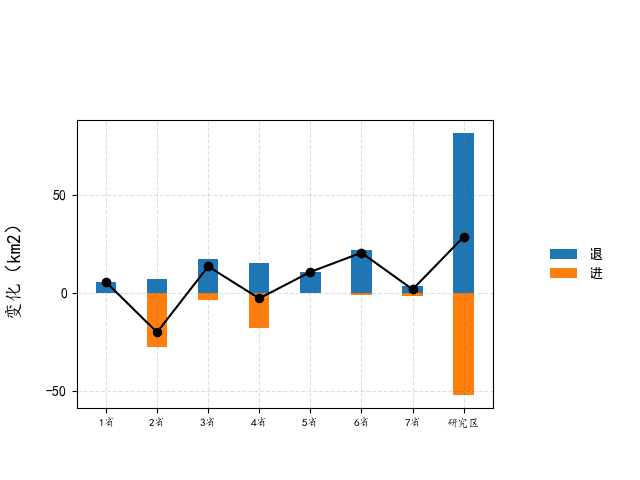
x=, np.array([& # 39; 1省& # 39;,& # 39;2省& # 39;,& # 39;3省& # 39;,& # 39;4省& # 39;,& # 39;5省& # 39;,& # 39;6省& # 39;,& # 39;7省& # 39;,& # 39;研究区& # 39;])
时间=y1 np.array ([5.5, 7.2, 17.3,, 15.0, 10.8, 21.8, 3.4, 81.4))
时间=y2 [0,, -27.5, -3.9,, -18.0, -0.2, -1.4, -1.7, -52.1)
y3 =, (5.5, -20.2, 13.4, -2.9, 10.6, 20.4, 1.7, 28.5)
loc=(0.12, 0.15, 0.65, 0.6)
plt.axes (loc)
plt.bar (x, y?, 0.4,标签=u # 39;退& # 39;)
plt.bar (x, y2, 0.4,标签=u # 39;进& # 39;)
plt.plot (x, y3,标志=& # 39;o # 39;, markersize=& # 39; 6 & # 39;, c=& # 39;黑色# 39;)
y=np.array ([0, -50,,, 50))
plt.xticks (x, fontproperties=& # 39; KaiTi& # 39;,字形大?8)
plt.yticks (y)
plt.grid (c=& # 39;灰色# 39;,线型=& # 39;——& # 39;,α=0.25)
plt.figtext (0.02, 0.45, s=& # 39;变化(平方公里)& # 39;,fontproperties=& # 39; KaiTi& # 39;,字形大?14,旋转=& # 39;垂直# 39;,verticalalignment=& # 39;中心# 39;,horizontalalignment=& # 39;中心# 39;)
# frameon=False 去掉图例边框
plt.legend (loc=& # 39;中心# 39;,,bbox_to_anchor=(1.2, 0.5), ncol=1,
,,,,,frameon=False)
plt.show ()
小编给大家分享一下PYTHON如何绘制雷达图代码,相信大部分人都还不怎么了解,因此分享这篇文章给大家参考一下,希望大家阅读完这篇文章后大有收获、下面让我们一起去了解一下吧!
<强> 1,雷达图
<强>结果:
<强> 2,实例2
<强>结果: