介绍 import numpy as np
得到mpl_toolkits.mplot3d import Axes3D
得到matplotlib import pyplot as plt
得到torch.autograd import 变量
import 火炬
得到torch import 神经网络
,
时间=X torch.unsqueeze (torch.linspace(1,, 1,, 100),,昏暗的=1)
时间=Y 4 * X +, 5, +, torch.rand (X.size ())
,
class LinearRegression (nn.Module):
自我,def __init__ ():
超级才能(LinearRegression,,自我). __init__ ()
时间=self.linear 才能;nn.Linear(1, 1), #,输入和输出的维度都是1
向前,def (自我,,X):
时间=out 才能;self.linear (X)
return 才能出来
,
时间=model LinearRegression ()
时间=criterion nn.MSELoss ()
时间=optimizer torch.optim.SGD (model.parameters (),, lr=1飞行)
,
num_epochs =1000
for epoch 拷贝范围(num_epochs):=,inputs 变量(X)=,target 变量(Y)
,#向前传播=,out 模型(输入)=,loss 标准(目标),,
,
,#向后传播
,optimizer.zero_grad(), #,注意每次迭代都需要清零
,loss.backward ()
,optimizer.step ()
,
,if (epoch +, 1), %, 20,==, 0:
打印才能(& # 39;时代({}/{}),失:{:.6f} & # 39; .format(时间+ epoch 1, num_epochs,, loss.item ()))
模型.埃瓦尔()
时间=predict 模型(变量(X))
时间=predict predict.data.numpy ()
plt.plot (X.numpy (),, Y.numpy (), & # 39; ro # 39;,,标签=& # 39;Original 数据# 39;)
plt.plot (X.numpy(),预测,,标签=& # 39;Fitting 行# 39;)
plt.show () 得到itertools import 计数
import 火炬
import torch.autograd
import torch.nn.functional as F
,
时间=POLY_DEGREE 3
def make_features (x):
,“““Builds features 即只a matrix with columns [x, x ^ 2,, x ^ 3] !”,“=,,x x.unsqueeze (1)
,return torch.cat ([x * *,小姐:for 小姐:拷贝范围(1,POLY_DEGREE + 1)),, 1)
,
,
时间=W_target torch.randn (POLY_DEGREE, 1)
时间=b_target torch.randn (1)
,
,
def f (x):
,return x.mm (W_target), +, b_target.item ()
def get_batch (batch_size=32):=,,random torch.randn (batch_size)=,,x make_features(随机)
,y f (x)=,
return , x,, y
#,Define 模型
时间=fc torch.nn.Linear (W_target.size (0), 1)
batch_x, batch_y =, get_batch ()
打印(batch_x batch_y)
for batch_idx 拷贝数(1):
,# Get 数据
,
,
,# Reset 梯度
,fc.zero_grad ()
,
,# Forward 通过=,,output F.smooth_l1_loss (fc (batch_x), batch_y)=,,loss output.item ()
,
,# Backward 通过
,output.backward ()
,
,# Apply 梯度
,for param fc.parameters拷贝():
param.data.add_才能(-0.1,*,param.grad.data)
,
,# Stop 标准
,if loss & lt; 1 e - 3:
,打破
,
,
def poly_desc (W, b):
,“““Creates a string description of a 多项式!”,“=,result & # 39; y =, & # 39;
,for 我,w 拷贝列举(W):
result 才能+=,& # 39;{:+ .2f}, x ^ {}, & # 39; .format (w, len (w),神;我)
+=,result & # 39; {: + .2f} & # 39; .format (b [0])
return 结果
,
,
打印(& # 39;损失:{:.6f}, after {},批次# 39;.format(损失,,batch_idx))
打印(& # 39;==祝辞,Learned 功能:\ t # 39;, +, poly_desc (fc.weight.view (1), fc.bias))
印刷(& # 39;==祝辞,Actual 功能:\ t # 39;, +, poly_desc (W_target.view (1), b_target))
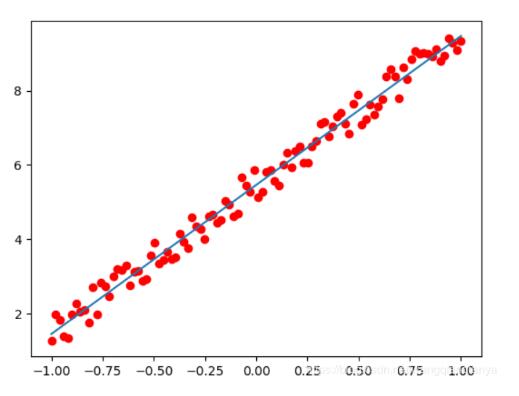
这篇文章将为大家详细讲解有关pytorch如何实现线性拟合方式,小编觉得挺实用的,因此分享给大家做个参考,希望大家阅读完这篇文章后可以有所收获。
<强>一维线性拟合
数据为y=x + 5加4上噪音
结果:
<强>多维:
关于“pytorch如何实现线性拟合方式”这篇文章就分享到这里了,希望以上内容可以对大家有一定的帮助,使各位可以学到更多知识,如果觉得文章不错,请把它分享出去让更多的人看的到。