这篇文章主要介绍了基于Python如何实现人脸自动戴口罩系统,具有一定借鉴价值,感兴趣的朋友可以参考下,希望大家阅读完这篇文章之后大有收获、下面让小编带着大家一起了解一下。
<强> 1项目背景
2019年新型冠状病毒感染的肺炎疫情发生以来,牵动人心,举国哀痛,口罩,酒精,消毒液奇货可居。
抢不到口罩,怎么办?作为技术人今天分享如何使用Python实现自动戴口罩系统,来安慰自己,系统效果如下所示:
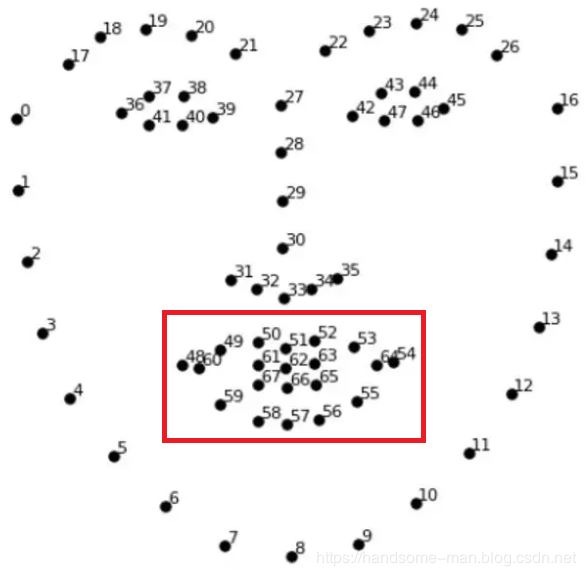
本系统的实现原理是借助Dlib模块的具有里程碑意义的人68个脸关键点检测库轻松识别出人脸五官数据,根据这些数据,确定嘴唇部分的位置数据(48点~ 67点的位置),根据检测到嘴部的尺寸和方向,借助锁相环模块调整口罩的尺寸和方向,实现将口罩放在图像的适当位置。
<强> 2,页面设计
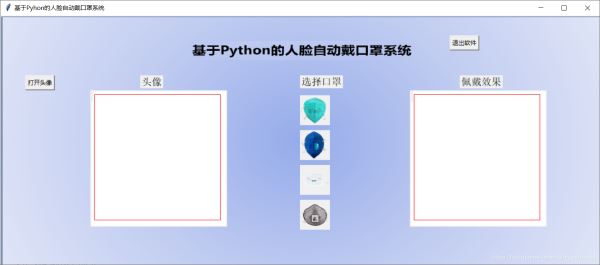
,基于tkinter模块实现GUI设计,可载入人物图像,选择四种类型口罩(这里的口罩是处理好的图片),展示佩戴好口罩的效果,操作完成退出系统,效果如下所示:
 def __init__(自我):=,,self.root tk.Tk ()
,self.root.title(& # 39;基于Pyhon的人脸自动戴口罩系统& # 39;)
1200年,self.root.geometry (& # 39; x500& # 39;)=,self.path2_ 没有=,self.path3_ 没有=,self.seg_img_path 没有=,self.mask 没有=,self.label_Img_seg 没有=,,decoration PIL.Image.open(& # 39;。/图片/bg.png& # 39;) .resize ((1200,, 500))=,,render ImageTk.PhotoImage(装饰)=,,img tk.Label(图片=渲染)
img.image =,呈现
,img.place (x=0, y=0)
,#原图1的展示
,tk.Button (self.root,文本=按蚩废瘛?,命令=self.show_original1_pic) .place (x=50,, y=120)
,tk.Button (self.root,文本=巴顺鋈砑?,,命令=辞职).place (x=900, y=40)
,tk.Label (self.root,文本=巴废瘛?,字体=10).place (x=280, y=120)=,,self.cv_orinial1 tk.Canvas (self.root, bg=& # 39;白色# 39;,,=270,宽度,高度=270)
,self.cv_orinial1.create_rectangle(8, 8日,260年,260年,宽度=1,轮廓=& # 39;红色# 39;)
,self.cv_orinial1.place (x=180, y=150)=,,self.label_Img_original1 tk.Label (self.root)
,self.label_Img_original1.place (x=180, y=150)
,tk.Label (self.root、文本=把≡窨谡帧?字体=10).place (x=600, y=120)=,,first_pic Image.open(“。/图片/Mask.png")=,,first_pic first_pic.resize(60岁,60),,Image.ANTIALIAS)=,,first_pic ImageTk.PhotoImage (first_pic)=,,self.first tk.Label (self.root,图像=first_pic)
,self.first.place (x=600, y=160,,=60,宽度,高度=60)
,self.first.bind (“& lt; Button-1>“,, self.mask0)=,,second_pic Image.open(“。/图片/Mask1.png")=,,second_pic second_pic.resize(60岁,60),,Image.ANTIALIAS)=,,second_pic ImageTk.PhotoImage (second_pic)=,,self.second_pic tk.Label (self.root,图像=second_pic)
,self.second_pic.place (x=600, y=230,宽度=60岁,身高=60)
,self.second_pic.bind (“& lt; Button-1>“,, self.mask1)=,,third_pic Image.open(“。/图片/Mask3.png")=,,third_pic third_pic.resize(60岁,60),,Image.ANTIALIAS)=,,third_pic ImageTk.PhotoImage (third_pic)=,,self.third_pic tk.Label (self.root,图像=third_pic)
,self.third_pic.place (x=600, y=300,宽度=60岁,身高=60)
,self.third_pic.bind (“& lt; Button-1>“,, self.mask3)=,,forth_pic Image.open(“。/图片/Mask4.png")=,,forth_pic forth_pic.resize(60岁,60),,Image.ANTIALIAS)=,,forth_pic ImageTk.PhotoImage (forth_pic)=,,self.forth_pic tk.Label (self.root,图像=forth_pic)
,self.forth_pic.place (x=600, y=370,宽度=60岁,身高=60)
,self.forth_pic.bind (“& lt; Button-1>“,, self.mask4)
,tk.Label (self.root,文本=芭宕餍Ч?,,字体=10).place (x=920, y=120)=,,self.cv_seg tk.Canvas (self.root, bg=& # 39;白色# 39;,,=270,宽度,高度=270)
,self.cv_seg.create_rectangle(8, 8日,260年,260年,宽度=1,轮廓=& # 39;红色# 39;)
,self.cv_seg.place (x=820, y=150)=,,self.label_Img_seg tk.Label (self.root)
,self.label_Img_seg.place (x=820, y=150)
之前,self.root.mainloop ()
def __init__(自我):=,,self.root tk.Tk ()
,self.root.title(& # 39;基于Pyhon的人脸自动戴口罩系统& # 39;)
1200年,self.root.geometry (& # 39; x500& # 39;)=,self.path2_ 没有=,self.path3_ 没有=,self.seg_img_path 没有=,self.mask 没有=,self.label_Img_seg 没有=,,decoration PIL.Image.open(& # 39;。/图片/bg.png& # 39;) .resize ((1200,, 500))=,,render ImageTk.PhotoImage(装饰)=,,img tk.Label(图片=渲染)
img.image =,呈现
,img.place (x=0, y=0)
,#原图1的展示
,tk.Button (self.root,文本=按蚩废瘛?,命令=self.show_original1_pic) .place (x=50,, y=120)
,tk.Button (self.root,文本=巴顺鋈砑?,,命令=辞职).place (x=900, y=40)
,tk.Label (self.root,文本=巴废瘛?,字体=10).place (x=280, y=120)=,,self.cv_orinial1 tk.Canvas (self.root, bg=& # 39;白色# 39;,,=270,宽度,高度=270)
,self.cv_orinial1.create_rectangle(8, 8日,260年,260年,宽度=1,轮廓=& # 39;红色# 39;)
,self.cv_orinial1.place (x=180, y=150)=,,self.label_Img_original1 tk.Label (self.root)
,self.label_Img_original1.place (x=180, y=150)
,tk.Label (self.root、文本=把≡窨谡帧?字体=10).place (x=600, y=120)=,,first_pic Image.open(“。/图片/Mask.png")=,,first_pic first_pic.resize(60岁,60),,Image.ANTIALIAS)=,,first_pic ImageTk.PhotoImage (first_pic)=,,self.first tk.Label (self.root,图像=first_pic)
,self.first.place (x=600, y=160,,=60,宽度,高度=60)
,self.first.bind (“& lt; Button-1>“,, self.mask0)=,,second_pic Image.open(“。/图片/Mask1.png")=,,second_pic second_pic.resize(60岁,60),,Image.ANTIALIAS)=,,second_pic ImageTk.PhotoImage (second_pic)=,,self.second_pic tk.Label (self.root,图像=second_pic)
,self.second_pic.place (x=600, y=230,宽度=60岁,身高=60)
,self.second_pic.bind (“& lt; Button-1>“,, self.mask1)=,,third_pic Image.open(“。/图片/Mask3.png")=,,third_pic third_pic.resize(60岁,60),,Image.ANTIALIAS)=,,third_pic ImageTk.PhotoImage (third_pic)=,,self.third_pic tk.Label (self.root,图像=third_pic)
,self.third_pic.place (x=600, y=300,宽度=60岁,身高=60)
,self.third_pic.bind (“& lt; Button-1>“,, self.mask3)=,,forth_pic Image.open(“。/图片/Mask4.png")=,,forth_pic forth_pic.resize(60岁,60),,Image.ANTIALIAS)=,,forth_pic ImageTk.PhotoImage (forth_pic)=,,self.forth_pic tk.Label (self.root,图像=forth_pic)
,self.forth_pic.place (x=600, y=370,宽度=60岁,身高=60)
,self.forth_pic.bind (“& lt; Button-1>“,, self.mask4)
,tk.Label (self.root,文本=芭宕餍Ч?,,字体=10).place (x=920, y=120)=,,self.cv_seg tk.Canvas (self.root, bg=& # 39;白色# 39;,,=270,宽度,高度=270)
,self.cv_seg.create_rectangle(8, 8日,260年,260年,宽度=1,轮廓=& # 39;红色# 39;)
,self.cv_seg.place (x=820, y=150)=,,self.label_Img_seg tk.Label (self.root)
,self.label_Img_seg.place (x=820, y=150)
之前,self.root.mainloop ()