介绍 import numpy as np
得到skimage import img_as_float
import matplotlib.pyplot as plt
得到skimage import io
import numpy.matlib
import 数学
file_name2=& # 39; D:/Visual 影响/PS 算法/4. jpg # 39;
img=io.imread (file_name2)
时间=img img_as_float (img)
行,,坳,channel =img.shape
时间=img_out img 1.0 *,
alpha 70.0=,
beta 30.0=,
degree 20.0=,
center_x =(col-1)/2.0
center_y =,(第1行)/2.0
时间=xx np.arange (col)
时间=yy np.arange(行)
时间=x_mask numpy.matlib.repmat (xx,,行,,1)
时间=y_mask numpy.matlib.repmat (yy,坳,,1)
时间=y_mask np.transpose (y_mask)
时间=xx_dif x_mask 作用;center_x
时间=yy_dif center_y 作用;y_mask
时间=x degree *, np.sin (2, *, math.pi *, yy_dif /,α),+ xx_dif
时间=y degree *, np.cos (2, *, math.pi *, xx_dif /,β),+ yy_dif
时间=x_new x + center_x
时间=y_new center_y 安康;y
时间=int_x np.floor (x_new)
时间=int_x int_x.astype (int)
时间=int_y np.floor (y_new)
时间=int_y int_y.astype (int)
for ii 拷贝范围(行):
for 才能;jj range 拷贝(col):
,,,new_xx =, int_x [二世,jj]
,,,new_yy =, int_y [二世,jj]
,,,if x_new [二世,jj], & lt;, 0,趁机x_new [二世,jj],祝辞,col 1,:
,,,,,继续
,,,if y_new [二世,jj], & lt;, 0,趁机y_new [二世,jj],祝辞,row 1,:
,,,,,继续
,,,img_out[二世,jj,:],=, img [new_xx new_yy也,,,)
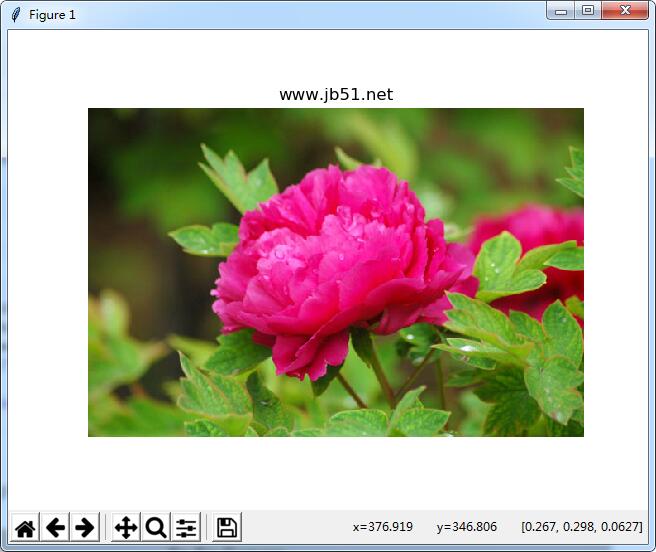
plt.figure (1)
plt.title (& # 39; www.jb51.net& # 39;)
plt.imshow (img)
plt.axis(& # 39;从# 39;)
plt.figure (2)
plt.title (& # 39; www.jb51.net& # 39;)
plt.imshow (img_out)
plt.axis(& # 39;从# 39;)
plt.show () % % %,波
% % %,波浪效果
clc;
clear ;
close ;
目录(& # 39;E: \ PhotoShop Algortihm \ Image 加工\ PS 算法# 39;);
我=imread (& # 39; 4. jpg # 39;);
形象=双(I);
%,图像=0.2989,*,我(:,:1),+,0.5870,*,我(:,:2),+,0.1140,*,我(:,:,3);
(行,坳、通道)=大小(图片);
地板(R=max(行,坳)/2);
Image_new=图像;
度=30;,,%,控制扭曲的程度
Center_X=(col + 1)/2;
Center_Y=(行+ 1)/2;
for i=1:行
for 才能;j=1:坳
,,,x0=j-Center_X;
,,,y0=Center_Y-i;
,,,x=学位* sin(2 *π* y0/128) + x0;
,,,y=学位* cos(2 *π* x0/128) + y0;
,,,x=x +坳/2;
,,,y=行/2 y;
,,,如果(x> 1,,,, x 1)
,,,,,x1=地板(x);
,,,,,日元=地板(y);
,,,,,p=x-x1;
,,,,,q=y-y1;
,,,,,,Image_new (i, j:)=(1 - p) * (1 q) *图像(x1, y1:) + p * (1 q) *图像(y1, x1 + 1,:)…
,,,,,,,,,,,,,+ q * (1 - p) *图像(x1, y1 + 1:) + p * *形象(y1 + 1, x1 + 1,:);
,才能结束
,结束
结束
图,,imshow (Image_new/255);
这篇文章给大家分享的是有关Python如何实现PS滤镜功能之波浪特效的内容。小编觉得挺实用的,因此分享给大家做个参考,一起跟随小编过来看看吧。
使用Python实现PS滤镜的波浪特效
<强>附录:PS滤镜——波浪波
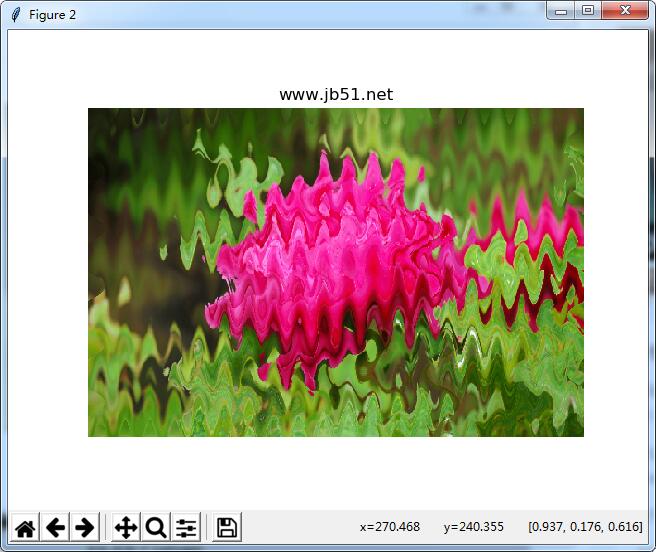
<强>本例Python运行效果:
原图
效果图
感谢各位的阅读!关于“Python如何实现PS滤镜功能之波浪特效”这篇文章就分享到这里了,希望以上内容可以对大家有一定的帮助,让大家可以学到更多知识,如果觉得文章不错,可以把它分享出去让更多的人看到吧!