本文实例为大家分享了Android雷达扫描效果的具体代码,供大家参考,具体内容如下
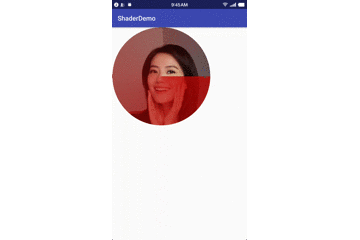
效果图
<强>知识点提要
<李>材质李
<李>矩阵矩阵李
<李>属性动画
李
ShaderView3
包com.example.apple.shaderdemo;
进口android.content.Context;
进口android.graphics.Bitmap;
进口android.graphics.BitmapFactory;
进口android.graphics.BitmapShader;
进口android.graphics.Canvas;
进口android.graphics.Color;
进口android.graphics.Matrix;
进口android.graphics.Paint;
进口android.graphics.Shader;
进口android.graphics.SweepGradient;
进口android.support.annotation.Nullable;
进口android.util.AttributeSet;
进口android.view.View;/* *
*由苹果>
包com.example.apple.shaderdemo;
进口android.animation.ObjectAnimator;
进口android.animation.ValueAnimator;
进口android.os.Bundle;
进口android.support.v7.app.AppCompatActivity;
进口android.view.View;
进口android.view.animation.LinearInterpolator;
公开课MainActivity延伸AppCompatActivity {
私人ShaderView3 mShaderView;
int度=0;
@Override
保护空白>
& lt; & # 63; xml version=" 1.0 " encoding=" utf - 8 " & # 63;比;
LinearLayout & lt;
xmlns: android=" http://schemas.android.com/apk/res/android "
xmlns:应用=" http://schemas.android.com/apk/res-auto "
xmlns:工具=" http://schemas.android.com/tools "
android: layout_width=" match_parent "
android: layout_height=" match_parent "
工具:上下文=癱om.example.apple.shaderdemo.MainActivity”比;
& lt; com.example.apple.shaderdemo.ShaderView3
android: id=癅 + id/sv”
android: layout_width=" 300 dp”
android: layout_height=" 300 dp”/比;
& lt;/LinearLayout>
之前
以上就是本文的全部内容,希望对大家的学习有所帮助,也希望大家多多支持。