
介绍 python主要应用领域有哪些 # !/usr/bin/env python3
#,- *安康;编码:utf-8 - * -
“““
Created 提醒Wed May 16 10:50:29 2018
@author: dag
“““
import sympy
import numpy as np
import 数学
得到matplotlib.pyplot import 情节
得到matplotlib.pyplot import 节目
import matplotlib.pyplot as plt
import matplotlib
#解决无法显示中文问题,帧是加载字体路径,根据自身电脑实际确定,具体请百度
时间=zhfont1 matplotlib.font_manager.FontProperties(?& # 39;/系统/图书馆/字体/Hiragino Sans GB W3.ttc& # 39;)
,
#随机产生3个参考节点坐标
maxy =1000
maxx =1000
时间=cx maxx * np.random.rand (3)
时间=cy maxy * np.random.rand (3)
dot1 =,情节(cy,残雪& # 39;k ^ & # 39;)
,
#生成盲节点,以及其与参考节点欧式距离
时间=mtx maxx * np.random.rand ()
时间=mty maxy * np.random.rand ()
plt.hold(& # 39;在# 39;)
时间=dot2 情节(mtx, mty, & # 39;去# 39;)
时间=da math.sqrt (np.square (mtx-cx [0]) + np.square (mty-cy [0]))
时间=db math.sqrt (np.square (mtx-cx [1]) + np.square (mty-cy [1])),
时间=dc math.sqrt (np.square (mtx-cx [2]) + np.square (mty-cy [2]))
,
#计算定位坐标,,
def triposition (xa,是的,哒,xb, yb, db, xc、yc, dc):,
,,,x, y =, sympy.symbols (& # 39; x y # 39;)
,,,f1 =, 2 * x * (xa-xc) + np.square (xc) -np.square (xa) + 2 * y * (ya-yc) + np.square (yc) -np.square(你)- (np.square (dc) -np.square (da))
,,,f2 =, 2 * x * (xb-xc) + np.square (xc) -np.square (xb) + 2 * y * (yb-yc) + np.square (yc) -np.square (yb)——(np.square (dc) -np.square (db))
,,,result =, sympy.solve ([f1, f2], [x, y])
,,,locx, locy =,结果[x],结果[y]
,,,return (locx,机车)
,,,,
#解算得到定位节点坐标
[locx,机车],=,triposition (cy[0],残雪[0]哒,残雪[1],cy [1], db,残雪[2],cy [2], dc)
plt.hold(& # 39;在# 39;)
dot3 =,情节(locx、机车& # 39;r * & # 39;)
,
#显示脚注
时间=x [[locx,残雪[0]],[locx,残雪[1]],[locx,残雪[2]]]
时间=y [[机车,cy[0]],[机车,cy[1]],[机车,cy [2]]]
for 小姐:拷贝范围(len (x)):
,,,plt.plot (x[我],[我],linestyle =, & # 39;——& # 39;, color =& # 39;舌鳎# 39;,)
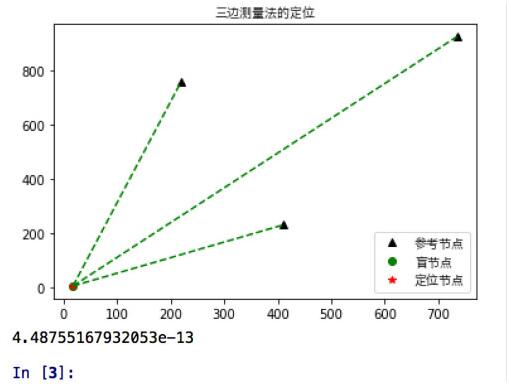
plt.title(& # 39;三边测量法的定位& # 39;,fontproperties=zhfont1),,
plt.legend([& # 39;参考节点& # 39;,& # 39;盲节点& # 39;,& # 39;定位节点& # 39;],,loc=& # 39; lower 对# 39;,道具=zhfont1)
显示(),
时间=derror math.sqrt (np.square (locx-mtx), +, np.square (locy-mty)),
打印(derror) import cv2
import numpy as np
import scipy.io as 新办
if __name__ ==, & # 39; __main__ # 39;:
,,,印刷(“main 函数!”)
,,,#验证点
,,,point =, np.array ((1.0, 2.0, 3.0))
,,,#获取相机参数
,,,cams_data =, scio.loadmat (& # 39;/data1/dy/SuperSMPL/数据/AMAfMvS_Dataset cameras_I_crane.mat& # 39;)
,,,Pmats =, cams_data [& # 39; Pmats& # 39;],, #, Pmats(8,, 3,, 4),投影矩阵,
,,,P1 =, Pmats [0,::]
,,,P3 =, Pmats [2,::]
,,,#通过投影矩阵将点从世界坐标投到像素坐标
,,,pj1 =, np.dot (P1, np.vstack ([point.reshape (3,1), np.array ([1]))))
,,,pj3 =, np.dot (P3, np.vstack ([point.reshape (3,1), np.array ([1]))))
,,,point1 =, pj1 [2:]/pj1[2:] #两行一列,齐次坐标转化
,,,point3 =, pj3 [2:]/pj3 [2:]
,,,#利用投影矩阵以及对应像素点,进行三角测量
,,,points =, cv2.triangulatePoints (P1, P3、point1 point3)
,,,#齐次坐标转化并输出
,,,print(点[0:3,:]/点[3:])
这篇文章给大家分享的是有python三关边测量定位怎么实现的内容。小编觉得挺实用的,因此分享给大家做个参考,一起跟随小编过来看看吧。
1,云计算,典型应用OpenStack.2,网前端开发,众多大型网站均为python开发。3。人工智能应用,基于大数据分析和深度学习而发展出来的人工智能本质上已经无法离开python.4,系统运维工程项目,自动化运维的标配就是python + Django/flask.5,金融理财分析,量化交易,金融分析。6,大数据分析。
定位原理很简单,故不赘述,直接上源码,内附注释。
输出效果图:
<强>补充:python opencv实现三角测量(三角)


